


Points clés
-
La création d'un gâteau au chocolat fourré à la mousse nécessite une préparation séparée des couches de gâteau, de la garniture mousse et du glaçage ganache
-
Utiliser du chocolat de haute qualité améliore considérablement la saveur et la texture du gâteau et de la mousse
-
Un refroidissement approprié entre les étapes d'assemblage assure la stabilité structurelle et des tranches nettes
-
Une barrière de mousse faite de crème au beurre empêche la garniture de s'échapper entre les couches
-
Les options à préparer à l'avance permettent une préparation jusqu'à 2 jours avant le service
-
Des ingrédients de qualité font toute la différence - explorez les options de chocolat premium chez Zucchero Canada pour de meilleurs résultats
Introduction : La décadence du gâteau au chocolat fourré à la mousse
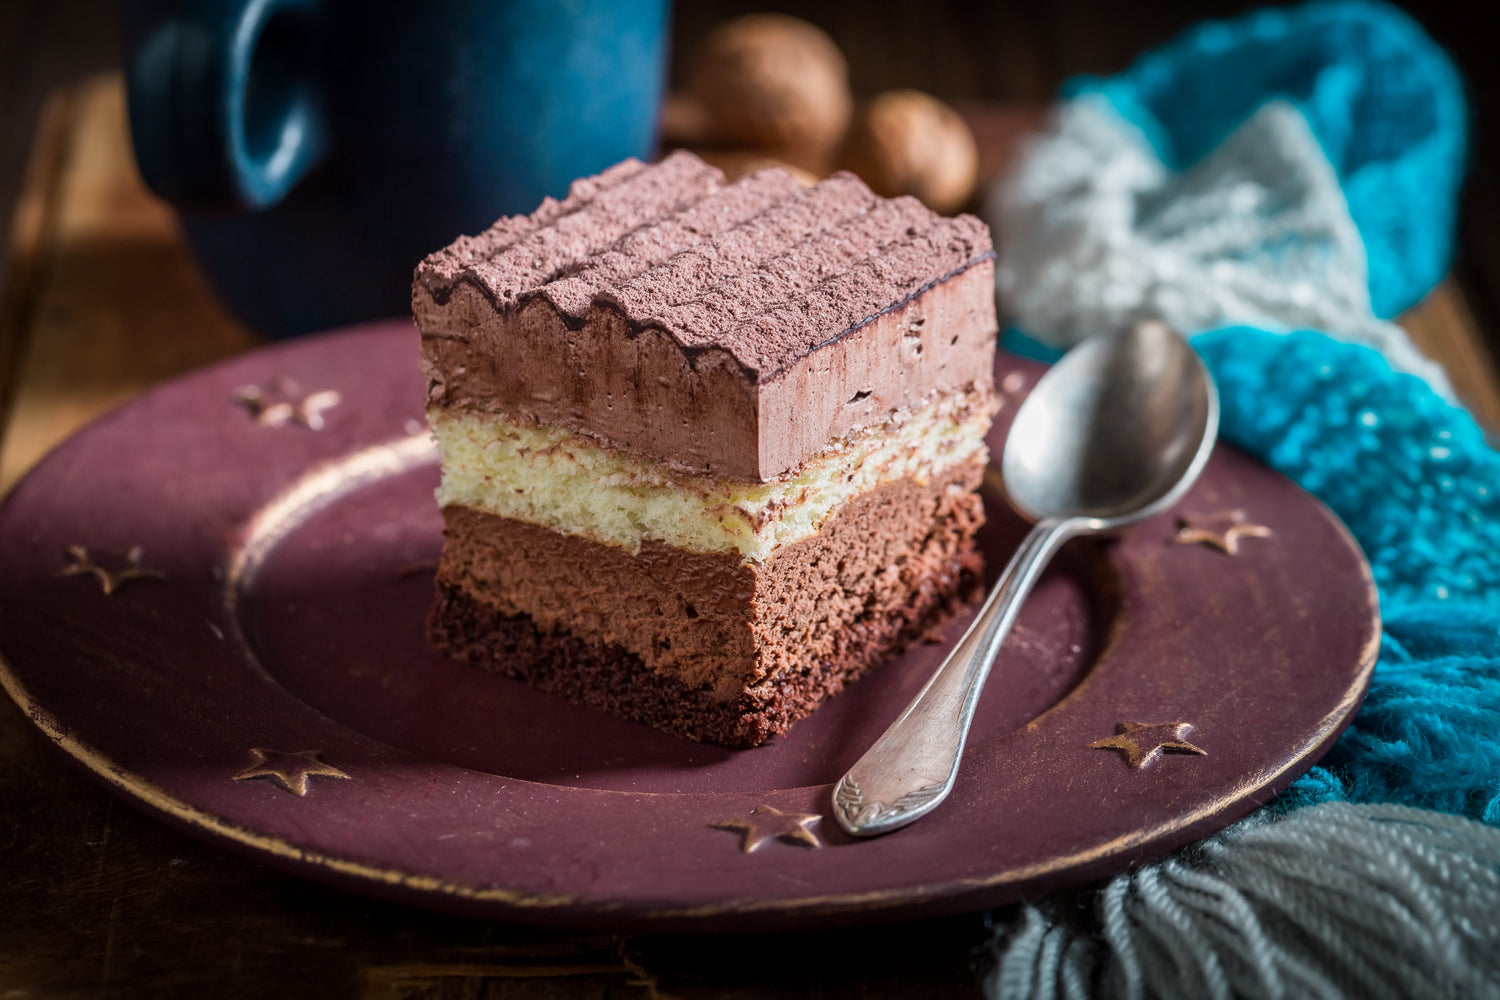
Il y a quelque chose d'indéniablement spécial à couper dans un gâteau au chocolat et à découvrir une couche de mousse soyeuse et légère nichée entre des couches de gâteau riches. Apprendre à faire un gâteau au chocolat fourré à la mousse élève votre répertoire de pâtisserie des friandises quotidiennes aux desserts spectaculaires dignes de célébration.
Bien que ce dessert élégant puisse sembler intimidant, il est en réalité accessible aux pâtissiers amateurs avec un peu de patience et les bonnes techniques. L'association d'un gâteau au chocolat moelleux avec une mousse légère et aérienne crée un contraste de textures parfait qui ravit à chaque bouchée. Surmonté d'un glaçage brillant, ce dessert devient non seulement délicieux mais aussi visuellement époustouflant.
Dans ce guide complet, nous vous accompagnerons à chaque étape de la création d'un spectaculaire gâteau au chocolat fourré à la mousse. De la sélection des meilleurs ingrédients à la maîtrise des techniques de montage, vous gagnerez la confiance nécessaire pour réaliser ce dessert impressionnant pour des occasions spéciales ou chaque fois que vous aurez envie d'une expérience chocolatée vraiment luxueuse.
Ingrédients et matériel nécessaires
Pour les couches de gâteau au chocolat
Pour créer la base de votre gâteau au chocolat fourré à la mousse, rassemblez ces ingrédients :
-
2 tasses (400g) de sucre granulé
-
1¾ tasses (220g) de farine tout usage
-
¾ tasse (90g) poudre de cacao de haute qualité
-
1½ cuillères à café de levure chimique
-
1½ cuillères à café de bicarbonate de soude
-
1 cuillère à café de sel
-
2 gros œufs, à température ambiante
-
1 tasse (240ml) de babeurre, à température ambiante
-
½ tasse (120ml) d'huile végétale
-
2 cuillères à café d'extrait de vanille
-
1 tasse (240ml) de café chaud ou d'eau chaude
Pour la garniture mousse au chocolat
L'ingrédient vedette de votre gâteau au chocolat fourré à la mousse nécessite ces ingrédients :
-
10 oz (280g) chocolat semi-amer noir ou de qualité, haché
-
2½ tasses (600ml) de crème épaisse, divisées
-
¼ tasse (50g) de sucre granulé
-
2 cuillères à soupe de beurre non salé
-
1 cuillère à café d'extrait de vanille
-
Une pincée de sel
Pour le nappage ganache au chocolat
Pour créer la finition brillante qui rend votre gâteau irrésistible :
-
8 oz (225g) chocolat noir de haute qualité, finement haché
-
1 tasse (240 ml) de crème épaisse
-
1 cuillère à soupe de beurre non salé
-
1 cuillère à soupe de sirop de maïs clair (optionnel, pour la brillance)
Équipement dont vous aurez besoin
Pour réussir à apprendre à faire un gâteau au chocolat fourré à la mousse, il faut ces outils :
-
Deux moules ronds à gâteau de 8 ou 9 pouces
-
Papier sulfurisé
-
Mixeur électrique (sur socle ou à main)
-
Saladiers (différentes tailles)
-
Fouet et spatules en caoutchouc
-
Tasses et cuillères à mesurer
-
Couteau dentelé pour niveler les gâteaux
-
Spatule décalée
-
Plateau tournant pour gâteau (optionnel mais utile)
-
Planche à gâteau ou assiette de service
-
Grille de refroidissement en fil métallique
-
Bain-marie ou bol compatible micro-ondes
-
Espace dans le réfrigérateur pour refroidir
Préparation du gâteau au chocolat
Préparation de vos moules
Commencez votre gâteau au chocolat fourré à la mousse avec des moules correctement préparés :
-
Préchauffez votre four à 350°F (175°C)
-
Graissez deux moules ronds de 8 ou 9 pouces
-
Recouvrez le fond avec des cercles de papier sulfurisé
-
Graissez le papier sulfurisé et saupoudrez légèrement de poudre de cacao
-
Tapotez pour enlever l'excès de poudre de cacao
Préparation de la pâte
-
Dans un grand bol, fouettez ensemble le sucre, la farine, la poudre de cacao, la levure chimique, le bicarbonate de soude et le sel
-
Ajoutez les œufs, le babeurre, l'huile et la vanille
-
Battez à vitesse moyenne pendant environ 2 minutes jusqu'à ce que le mélange soit homogène
-
Incorporez le café chaud ou l'eau (la pâte sera liquide – c'est normal)
-
Répartissez la pâte également entre les moules préparés
Cuisson et refroidissement
-
Faites cuire pendant 30-35 minutes, ou jusqu'à ce qu'un cure-dent inséré au centre ressorte avec quelques miettes humides
-
Laissez refroidir dans les moules sur des grilles métalliques pendant 10 minutes
-
Passez un couteau autour des bords et démoulez sur des grilles
-
Retirez le papier sulfurisé et laissez refroidir complètement
-
Une fois refroidi, enveloppez dans un film plastique et réfrigérez au moins 1 heure (les gâteaux froids sont plus faciles à manipuler)
Préparer la garniture mousse au chocolat
Créer la base au chocolat
La base de votre garniture mousse commence par un chocolat parfaitement fondu :
-
Placez le chocolat haché et 2 cuillères à soupe de beurre dans un bol résistant à la chaleur
-
Chauffez ½ tasse (120 ml) de crème épaisse jusqu'à frémissement
-
Verser la crème chaude sur le chocolat et laisser reposer 1 minute
-
Remuez doucement jusqu'à ce que le chocolat soit complètement fondu et que le mélange soit lisse
-
Incorporez l'extrait de vanille et le sel
-
Laissez refroidir à température ambiante en remuant de temps en temps (doit être frais mais encore fluide)
Fouetter la crème
-
Dans un bol froid, fouettez les 2 tasses (480 ml) restantes de crème épaisse avec le sucre jusqu'à formation de pics mous
-
Faites attention à ne pas trop fouetter – la crème doit être aérienne mais pas ferme
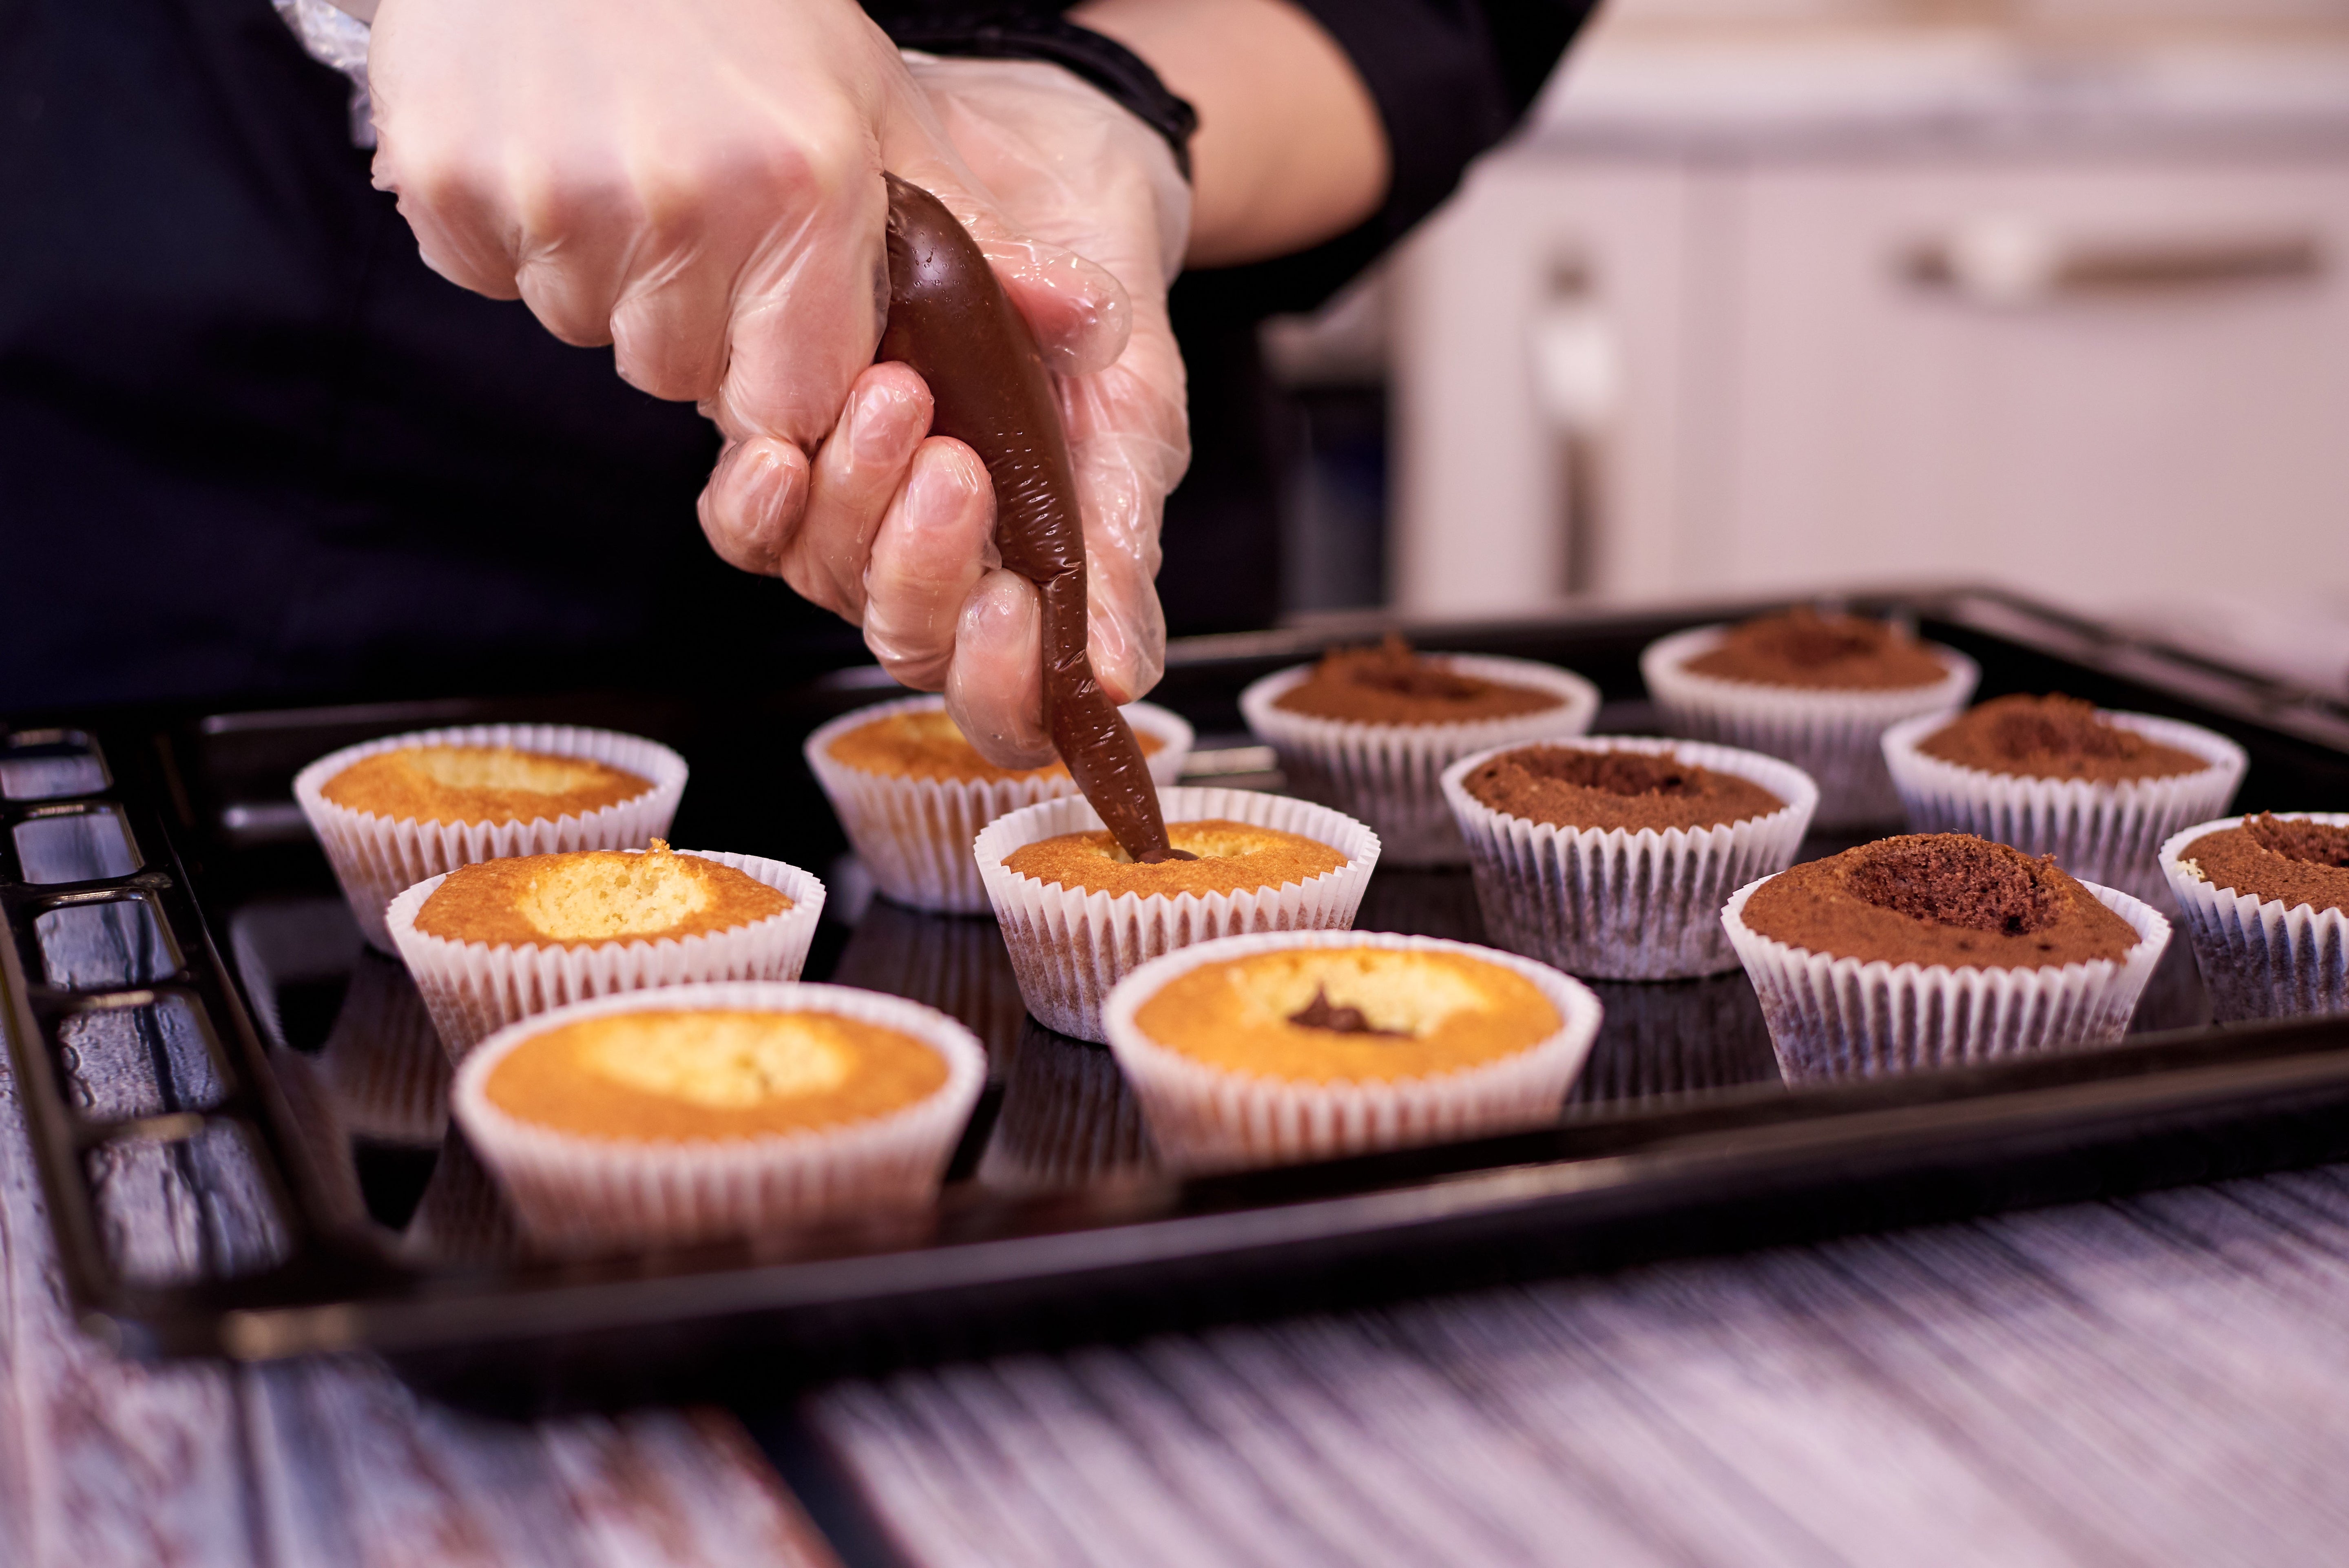
Incorporer la mousse
-
Vérifiez que votre préparation au chocolat est fraîche mais encore fluide (le chocolat chaud fera retomber la crème fouettée)
-
Prenez environ ⅓ de la crème fouettée et mélangez-la à la préparation au chocolat pour l'alléger
-
À l'aide d'une spatule en caoutchouc, incorporez délicatement la crème fouettée restante en deux fois
-
Utilisez une main légère et incorporez délicatement jusqu'à ce qu'il n'y ait plus de stries
-
Couvrir et réfrigérer pendant 30 minutes pour raffermir légèrement avant le montage
Assembler le gâteau au chocolat fourré à la mousse
Préparation pour le montage
Réussir à apprendre à faire un gâteau au chocolat fourré à la mousse inclut une préparation adéquate :
-
Si ce n'est pas déjà fait, égalisez vos couches de gâteau avec un couteau dentelé si elles ont un dessus bombé
-
Placez une petite noisette de glaçage ou de mousse sur votre plaque à gâteau ou assiette de service pour ancrer la première couche
-
Ayez votre garniture de mousse et une petite quantité de beurre (si utilisé) prêts
-
Assurez-vous d'avoir de la place dans le réfrigérateur pour le gâteau assemblé
Créer une barrière de mousse (optionnel mais recommandé)
Pour garantir que votre mousse reste parfaitement contenue :
-
Préparez une petite quantité de beurre au chocolat ou utilisez un peu de votre ganache (une fois refroidie et épaissie)
-
Placez dans une poche à douille munie d'une douille ronde moyenne
-
Pochez un anneau autour du bord de la couche inférieure du gâteau
-
Cette « barrière » empêche la mousse de s'échapper lorsque la couche supérieure est ajoutée
Montage et garniture
-
Placez une couche de gâteau sur votre plaque à gâteau ou assiette de service, côté coupé vers le haut
-
Si vous utilisez une barrière, pochez-la autour du périmètre
-
Remplissez le centre avec environ 1½-2 tasses de mousse, en étalant uniformément avec une spatule décalée
-
Déposez délicatement la deuxième couche de gâteau dessus, côté coupé vers le bas
-
Appuyez très légèrement pour fixer
-
Réfrigérez au moins 1 heure pour que la mousse prenne avant d'ajouter la ganache
Préparation et ajout du nappage ganache
Préparation de la ganache
-
Placez le chocolat finement haché dans un bol résistant à la chaleur
-
Chauffez la crème dans une casserole jusqu'à ce qu'elle commence juste à frémir
-
Verser la crème chaude sur le chocolat et laisser reposer 1 minute
-
Remuez doucement jusqu'à obtenir une texture lisse et brillante
-
Ajoutez le beurre et le sirop de maïs (si utilisé) et remuez jusqu'à incorporation
-
Laissez refroidir 10-15 minutes jusqu'à ce qu'il épaississe légèrement mais reste coulant
Nappage du gâteau
-
Retirez le gâteau refroidi du réfrigérateur
-
Placez le gâteau sur une grille au-dessus d'une plaque de cuisson pour récupérer les gouttes
-
En commençant par le centre, versez la ganache sur le dessus du gâteau
-
Utilisez une spatule décalée pour la guider jusqu'aux bords, en la laissant couler sur les côtés
-
Pour une couverture complète, utilisez la spatule pour étaler la ganache sur les côtés
-
Remettez le gâteau au réfrigérateur pendant au moins 30 minutes pour que la ganache prenne
Conseils pour des résultats parfaits
Contrôle de la température
La gestion de la température est cruciale pour apprendre à faire un gâteau au chocolat fourré à la mousse :
-
Couches de gâteau froides: Réfrigérez les couches avant l'assemblage pour les rendre plus fermes et plus faciles à manipuler
-
Mousse à température ambiante: La mousse doit être fraîche mais encore assez souple pour s'étaler facilement
-
Consistance correcte de la ganache: Si trop chaud, la ganache coulera du gâteau ; si trop froid, elle ne s'écoulera pas bien
-
Temps de refroidissement: Ne précipitez pas les étapes de refroidissement entre les phases d'assemblage
La qualité du chocolat est importante
La qualité du chocolat impacte directement vos résultats :
-
Utilisation chocolat de haute qualité avec au moins 55-70 % de cacao pour une saveur optimale
-
Évitez les pépites de chocolat pour la mousse et la ganache car elles contiennent des stabilisants
-
Différents pourcentages de chocolat créent différents profils de saveur — expérimentez pour trouver votre préférence
-
Le chocolat de meilleure qualité fond plus facilement et crée des textures plus soyeuses
Stratégies de préparation à l'avance
Planifiez votre timing avec ces options de préparation à l'avance :
-
Les couches de gâteau peuvent être cuites jusqu'à 3 jours à l'avance et conservées au réfrigérateur (bien emballées)
-
La mousse peut être préparée jusqu'à 24 heures à l'avance et réfrigérée
-
Le gâteau entièrement assemblé (sans ganache) peut être réfrigéré toute la nuit
-
Le gâteau complet peut être préparé jusqu'à 2 jours à l'avance et conservé au réfrigérateur
Variations et combinaisons de saveurs
Saveurs alternatives de mousse
Une fois que vous aurez maîtrisé la préparation du gâteau au chocolat fourré à la mousse, essayez ces variantes :
-
Mousse au chocolat blanc: Remplacez le chocolat noir par du chocolat blanc et réduisez légèrement la crème
-
Mousse infusée au café: Ajoutez 1 cuillère à soupe de poudre d'espresso instantané à la crème chaude
-
Mousse au chocolat et framboise: Incorporez ¼ de tasse de purée de framboise filtrée
-
Mousse au chocolat et beurre de cacahuète: Ajoutez ¼ de tasse de beurre de cacahuète lisse à la base de chocolat
-
Mousse au chocolat à la menthe: Ajoutez ¼ de cuillère à café d'extrait de menthe au mélange de chocolat
Alternatives de saveurs pour gâteau
Bien que le gâteau au chocolat classique soit traditionnel, considérez ces options :
-
Gâteau au chocolat noir avec une profondeur supplémentaire grâce au sucre brun
-
Gâteau Red Velvet pour un contraste de couleur saisissant
-
Gâteau chocolat-noisette avec des noisettes moulues dans la pâte
-
Gâteau au chocolat rehaussé d'espresso pour les amateurs de café
-
Gâteau au chocolat mexicain avec cannelle et une pointe de piment
Finitions décoratives
Sublimez la présentation de votre gâteau au chocolat rempli de mousse :
-
Boucles ou copeaux de chocolat sur le dessus
-
Baies fraîches disposées de manière décorative
-
Feuille d'or comestible pour les occasions spéciales
-
Poudre de cacao saupoudrée à travers un pochoir
-
Rosettes de crème fouettée avec fraises enrobées de chocolat
Conseils de conservation et de préparation à l'avance
Consignes de réfrigération
Un stockage approprié garantit que votre gâteau au chocolat fourré à la mousse reste parfait :
-
Réfrigérez toujours les gâteaux fourrés à la mousse en raison de la teneur en produits laitiers
-
Conservez couvert ou dans une boîte à gâteau pour éviter l'absorption des odeurs du réfrigérateur
-
Laissez 30-45 minutes à température ambiante avant de servir pour une meilleure saveur et texture
-
Peut être réfrigéré jusqu'à 3-4 jours
Options de congélation
Oui, vous pouvez congeler un gâteau au chocolat fourré à la mousse :
-
Refroidissez d'abord soigneusement le gâteau terminé au réfrigérateur
-
Placez le gâteau non emballé au congélateur jusqu'à ce qu'il soit ferme (environ 2 heures)
-
Bien envelopper dans un film plastique, puis dans du papier aluminium
-
Congelez jusqu'à 1 mois
-
Décongelez toute la nuit au réfrigérateur, puis 1 heure à température ambiante avant de servir
Questions fréquemment posées sur le gâteau au chocolat fourré à la mousse
Pourquoi ma mousse est-elle devenue granuleuse ?
Une mousse granuleuse résulte généralement de l'un des deux problèmes suivants :
-
Surchauffe du chocolat: Si le chocolat devient trop chaud pendant la fonte, il peut saisir ou devenir granuleux. Faites toujours fondre doucement et retirez du feu avant qu'il ne soit complètement fondu, en laissant la chaleur résiduelle terminer le processus.
-
Choc thermique: Ajouter de la crème froide au chocolat chaud ou inversement peut provoquer une solidification inégale du chocolat. Assurez-vous que votre mélange de chocolat a refroidi à température ambiante avant d'incorporer la crème fouettée.
Puis-je faire ce gâteau sans produits laitiers ?
Oui, vous pouvez adapter cette recette aux régimes sans produits laitiers :
-
Remplacez le babeurre par une alternative sans produits laitiers mélangée avec 1 cuillère à soupe de vinaigre
-
Utilisez de la crème de coco à la place de la crème épaisse pour la mousse (réfrigérée toute la nuit et uniquement la partie solide)
-
Choisissez du chocolat sans produits laitiers pour tous les composants
-
Remplacez le beurre par de l'huile de coco ou de la margarine sans produits laitiers
La texture peut être légèrement différente, mais vous pouvez toujours créer une version délicieuse sans produits laitiers.
Pourquoi ma garniture de mousse s'échappe-t-elle lorsque j'ajoute la couche supérieure ?
Ce problème courant lors de l'apprentissage de la fabrication d'un gâteau au chocolat fourré à la mousse a plusieurs solutions :
-
Créez une barrière de glaçage: Dressez un cordon de crème au beurre autour du bord pour contenir la mousse
-
Réfrigérez la mousse plus longtemps: Assurez-vous qu'elle est bien prise avant l'assemblage
-
Ne pas trop remplir: Utilisez une quantité modérée de mousse entre les couches
-
Manipulez délicatement: Placez soigneusement la couche supérieure et appuyez très légèrement
Comment obtenir des tranches nettes lors du service ?
Pour des tranches parfaites en photo de gâteau au chocolat rempli de mousse :
-
Refroidissez le gâteau complètement (au moins 2 heures avant de servir)
-
Trempez un couteau long et tranchant dans de l'eau chaude
-
Essuyez le couteau proprement et séchez-le
-
Coupez d'un seul mouvement vers le bas
-
Nettoyez et chauffez le couteau entre chaque tranche
-
Laissez reposer les tranches 5 à 10 minutes avant de servir pour une meilleure saveur
Puis-je utiliser un mélange pour gâteau en boîte comme raccourci ?
Oui, le mélange pour gâteau en boîte peut fonctionner comme une option pour gagner du temps :
-
Choisissez un mélange pour gâteau au chocolat noir de haute qualité
-
Améliorez-le en ajoutant 1 œuf supplémentaire, en remplaçant l'eau par du café, et en utilisant du beurre fondu au lieu de l'huile
-
Suivez le même processus d'assemblage avec votre mousse maison
-
La texture et la saveur ne seront pas identiques à celles faites maison de A à Z, mais cela peut quand même être délicieux
Conclusion : Créez votre chef-d'œuvre
Apprendre à faire un gâteau au chocolat rempli de mousse est à la fois un accomplissement et un cadeau — pour vous-même et pour ceux qui ont la chance de le partager avec vous. Bien que cela nécessite plusieurs étapes et un peu de patience, le processus est réalisable pour les pâtissiers amateurs prêts à suivre les techniques décrites dans ce guide.
La combinaison d'un gâteau au chocolat riche, d'une mousse aérienne et d'un glaçage brillant crée un dessert digne d'une célébration. Chaque composant joue un rôle crucial dans l'expérience finale : le gâteau apporte structure et profondeur de saveur, la mousse contribue à la légèreté et à la texture soyeuse, et le glaçage ajoute une finition décadente qui rend le gâteau visuellement époustouflant.
N'oubliez pas que des ingrédients de qualité font une différence significative dans le résultat final. Pour le meilleur chocolat afin d'élever votre création, explorez La collection de chocolat premium de Zucchero Canada. Leur sélection de chocolats de haute qualité garantira que votre gâteau au chocolat rempli de mousse atteigne une saveur et une texture dignes d'un professionnel.
Avec de la pratique, vous pourriez vous surprendre à adapter ce dessert classique avec vos propres variations créatives, allant de différentes infusions de saveurs à des techniques décoratives qui rendent le gâteau unique. Quelle que soit votre approche, ce dessert spectaculaire est sûr de devenir un favori pour les occasions spéciales et les célébrations.


Laisser un commentaire
Tous les commentaires sont modérés avant d'être publiés.
Ce site est protégé par hCaptcha, et la Politique de confidentialité et les Conditions de service de hCaptcha s’appliquent.