


Points clés
- Colorant alimentaire à base d'huile est essentiel pour colorer le chocolat - les colorants à base d'eau feront saisir le chocolat
- Colorant alimentaire en gel fonctionne mieux pour des résultats vibrants et constants tant dans le chocolat blanc que dans le chocolat au lait
- Chocolat blanc accepte la couleur le plus facilement, tandis que le chocolat noir nécessite des teintes plus claires ou une couverture complète
- Colorants en poudre comme la poudre de cacao et les poudres de fruits lyophilisés offrent des options de coloration naturelles
- Contrôle de la température est crucial - ajoutez la couleur au chocolat à 31-32°C pour de meilleurs résultats
- Moins c'est plus - commencez par de petites quantités et augmentez la couleur progressivement pour éviter de dominer le chocolat
Découvrez des couleurs pour chocolat et des ingrédients premium chez Zucchero Canada pour votre prochain projet de coloration du chocolat.
Introduction
Apprentissage comment colorer le chocolat ouvre un monde de possibilités créatives pour les boulangers, chocolatiers et amateurs de desserts. Que vous créiez des barres de chocolat aux couleurs arc-en-ciel, des décorations de gâteaux vibrantes ou des friandises thématiques pour des occasions spéciales, maîtriser les techniques de coloration du chocolat transforme des confiseries ordinaires en chefs-d'œuvre visuels époustouflants.
L'art de coloration du chocolat a considérablement évolué au fil des ans, la technologie alimentaire moderne offrant aux chocolatiers une gamme d'options de coloration qui préservent l'intégrité du chocolat tout en obtenant des teintes brillantes. Des teintes pastel subtiles aux nuances audacieuses et vibrantes, les techniques de coloration actuelles permettent une expression créative sans précédent.
De nombreux pâtissiers amateurs découvrent la coloration du chocolat par nécessité - peut-être pour obtenir du chocolat rose pour une baby shower ou des accents bleus pour un gâteau d'anniversaire. Ce qui commence comme une simple exigence se transforme souvent en une exploration passionnée de la théorie des couleurs, des combinaisons de saveurs et du travail artistique du chocolat. Comprendre la science derrière la coloration du chocolat garantit des résultats constants et professionnels à chaque fois.
La clé d'une coloration réussie du chocolat réside dans la compréhension des propriétés uniques du chocolat et de la façon dont différents agents colorants interagissent avec le beurre de cacao, les solides de lait et les cristaux de sucre. Ce guide complet fournit tout ce que vous devez savoir pour colorer le chocolat efficacement et en toute sécurité.
Comprendre le chocolat et la chimie des couleurs
Avant de plonger dans des techniques de coloration spécifiques, il est essentiel de comprendre pourquoi le chocolat se comporte différemment des autres aliments en matière de coloration. La composition à base de graisses du chocolat crée des défis et des opportunités uniques pour l'application de la couleur.
La science derrière la structure du chocolat : Le chocolat se compose principalement de solides de cacao, de beurre de cacao, de sucre et, dans le cas du chocolat au lait, de solides de lait. Cet environnement riche en graisses signifie que les colorants à base d'eau feront "saisir" le chocolat - devenant épais, granuleux et ingérable. Le beurre de cacao forme la phase continue qui transporte la saveur et détermine la texture, ce qui rend crucial le choix d'agents colorants compatibles.
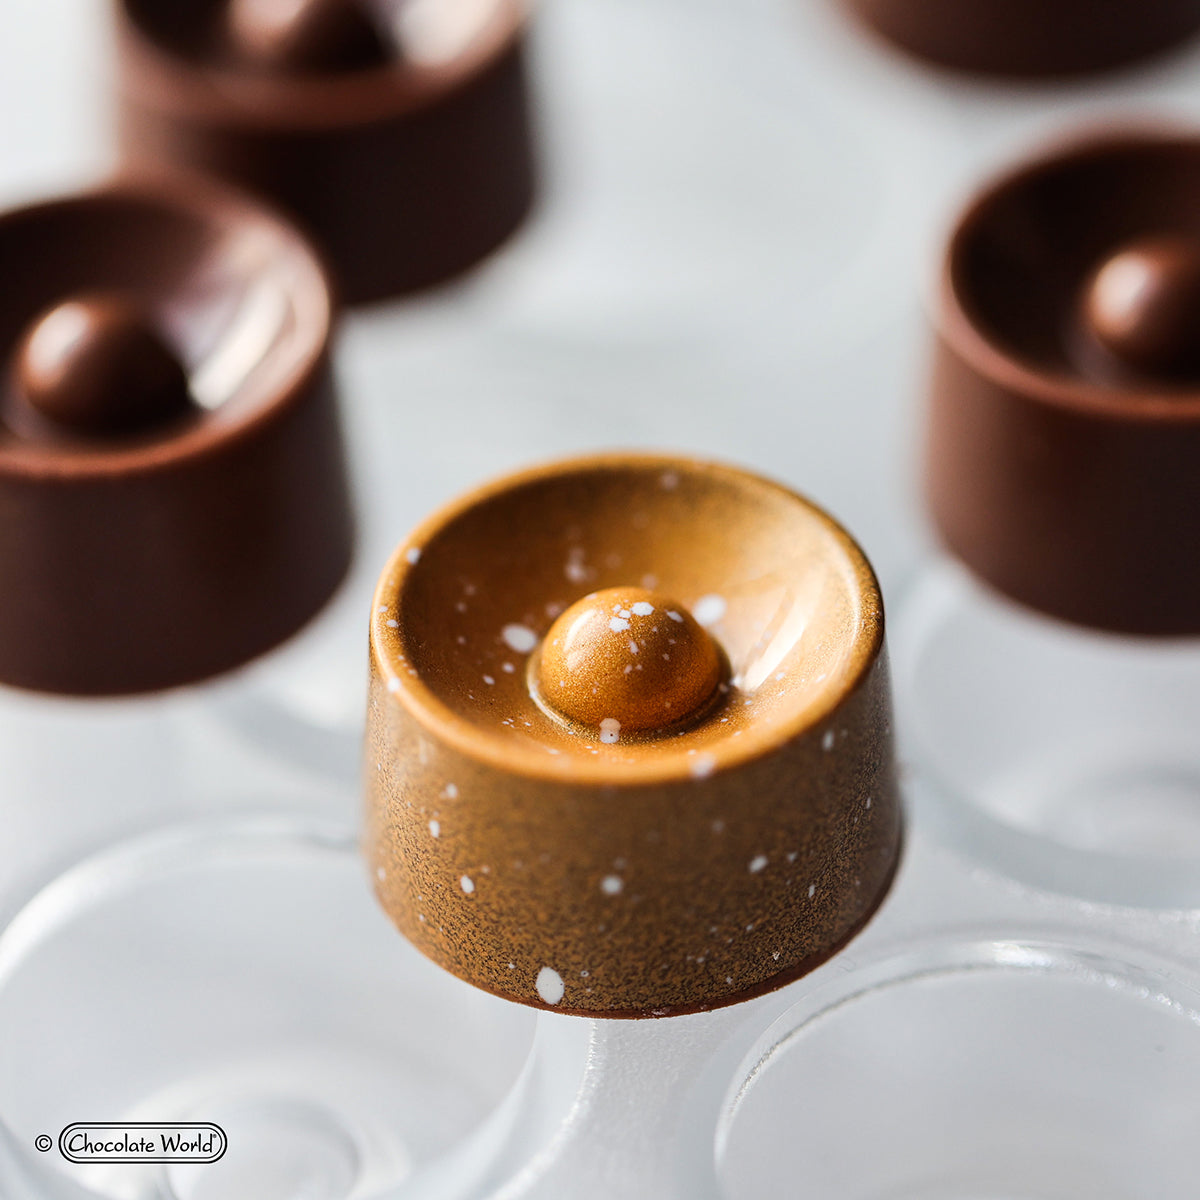
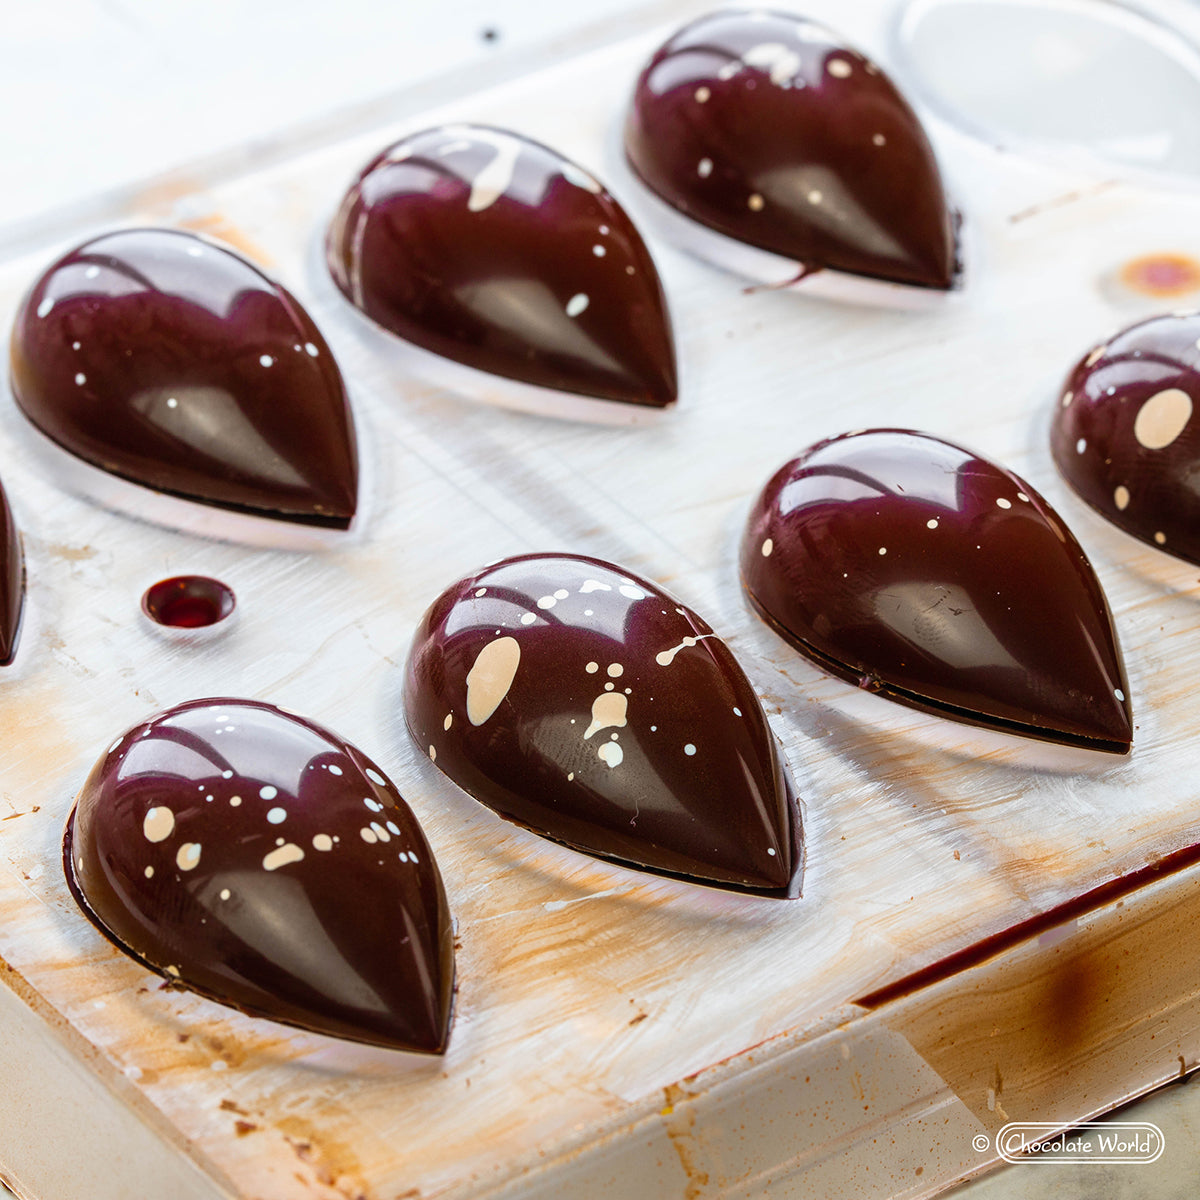
Interaction des couleurs avec différents types de chocolat : Le chocolat blanc offre la base la plus neutre pour la coloration car il ne contient pas de solides de cacao qui pourraient interférer avec la perception des couleurs. Le chocolat au lait a une base beige qui affecte l'apparence des couleurs, tandis que la couleur brun foncé du chocolat noir limite les options de coloration aux teintes plus foncées ou aux applications en surface.
Sensibilité à la température : La nature polymorphe du chocolat signifie qu'il existe sous différentes formes cristallines à différentes températures. Lors de l'ajout de couleur, maintenir des plages de température appropriées garantit que le chocolat reste tempéré et produit une finition brillante avec un bon cassant une fois durci.
Comprendre ces propriétés fondamentales aide à expliquer pourquoi certaines méthodes de coloration fonctionnent mieux que d'autres et pourquoi les chocolatiers professionnels investissent dans des produits de coloration spécialisés conçus spécifiquement pour le travail du chocolat.
Peut-on teindre le chocolat au lait ?
Oui, vous pouvez teindre le chocolat au lait, mais le processus nécessite de comprendre comment la composition du chocolat au lait affecte les résultats de couleur. La couleur beige naturelle du chocolat au lait influence l'apparence finale des couleurs ajoutées, créant des défis et des opportunités uniques pour l'expression créative.
Travailler avec la couleur de base du chocolat au lait : La base caramel du chocolat au lait signifie que les couleurs apparaîtront différemment que dans le chocolat blanc. Les couleurs claires comme le jaune et l'orange se marient souvent magnifiquement avec la teinte naturelle du chocolat au lait, tandis que des couleurs comme le bleu et le vert peuvent paraître atténuées ou prendre des tons inattendus.
Choix de couleurs réussis pour le chocolat au lait :
- Tons chauds - les rouges, oranges et jaunes complètent la base naturelle de caramel
- Tons terreux - les bruns, ors et oranges profonds renforcent la richesse du chocolat
- Teintes plus foncées - le bordeaux, le vert forêt et le bleu marine peuvent dominer la couleur de base
- Effets métalliques - les lustres or et bronze fonctionnent exceptionnellement bien avec le chocolat au lait
Adaptations techniques : Lors de la coloration du chocolat au lait, il peut être nécessaire d'utiliser plus de colorant pour obtenir l'intensité désirée comparé au chocolat blanc. Commencez par de petits lots tests pour comprendre comment les couleurs apparaîtront dans votre chocolat au lait spécifique avant de passer à des quantités plus importantes.
Les chocolatiers professionnels valorisent souvent la couleur naturelle du chocolat au lait comme un atout plutôt que de la combattre, créant des palettes de couleurs sophistiquées qui s'harmonisent avec les tons inhérents du chocolat.
Types de colorants alimentaires pour chocolat
Comprendre les différents types de colorant alimentaire pour chocolat vous aide à choisir le produit adapté aux besoins spécifiques de votre projet. Tous les colorants alimentaires ne conviennent pas au travail du chocolat, et utiliser le mauvais type peut ruiner un lot entier.
Colorant alimentaire à base d'huile : La référence en matière de coloration du chocolat, les couleurs à base d'huile se mélangent parfaitement avec la teneur en matières grasses du chocolat sans provoquer de saisissement. Ces colorants offrent des résultats vibrants et constants et sont disponibles sous forme liquide et pâteuse.
Avantages :
- Aucun risque de saisissement du chocolat
- Excellente intensité et constance de la couleur
- Longue durée de conservation lorsqu'il est stocké correctement
- Compatible avec tous les types de chocolat
Colorant alimentaire en gel (à base d'huile) : Les colorants en gel concentrés conçus spécialement pour le chocolat offrent une intensité de couleur supérieure avec un ajout de volume minimal. Ces produits sont généralement conditionnés en petits contenants mais fournissent assez de pouvoir colorant pour plusieurs projets.
Colorants en poudre : Les colorants en poudre naturels et synthétiques offrent des avantages uniques pour des applications spécifiques. La poudre de cacao ajoute des tons bruns tout en conservant la saveur du chocolat, tandis que les poudres de fruits apportent à la fois couleur et saveurs complémentaires.
Options naturelles :
- Poudres de fruits lyophilisés - fraise pour le rose, myrtille pour le violet
- Poudre de spiruline - coloration naturelle bleu-vert
- Curcuma - couleur jaune doré avec des notes terreuses
- Poudre de betterave - coloration naturelle du rose au rouge
À éviter : N'utilisez jamais de colorants alimentaires à base d'eau, d'extraits à forte teneur en eau, ni aucun agent colorant contenant de l'eau comme ingrédient principal. Ceux-ci feront saisir le chocolat et le rendront inutilisable.
Comment colorer le chocolat fondu étape par étape
Apprentissage comment colorer le chocolat fondu assure correctement des résultats professionnels et prévient les erreurs courantes qui peuvent ruiner votre travail au chocolat. Ce processus étape par étape fonctionne pour tous les types de projets de coloration du chocolat.
Phase de préparation : Commencez par rassembler tous les matériaux nécessaires avant de faire fondre votre chocolat. Avoir tout prêt évite les fluctuations de température qui pourraient affecter vos résultats finaux.
Équipement essentiel :
- Bain-marie ou bol compatible micro-ondes
- Spatule en caoutchouc pour remuer
- Thermomètre pour le contrôle de la température
- Petites cuillères pour mesurer le colorant
- Espace de travail propre et sec
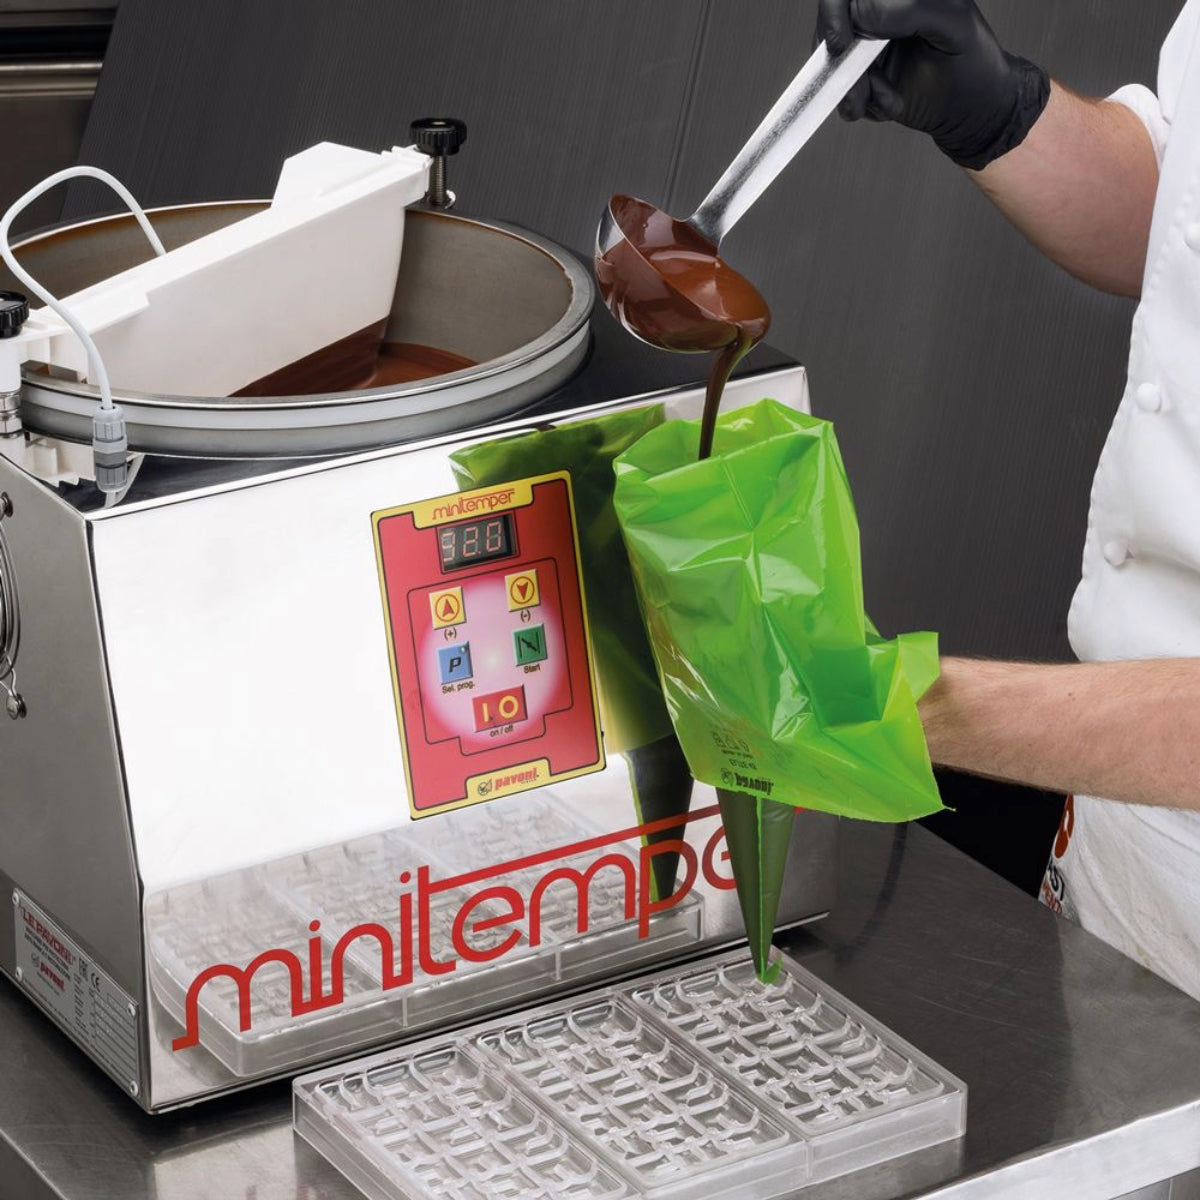
Étape 1 : Fonte correcte du chocolat Faites fondre votre chocolat en utilisant une chaleur douce pour maintenir le tempérage. Pour la méthode au bain-marie, assurez-vous qu'aucune eau ne touche le chocolat. Pour la fonte au micro-ondes, utilisez des intervalles de 30 secondes à 50 % de puissance, en remuant entre chaque intervalle.
Étape 2 : Contrôle de la température Laissez le chocolat fondu refroidir à 88-90°F (31-32°C) avant d'ajouter la couleur. Cette plage de température garantit un mélange optimal des couleurs sans affecter le tempérage du chocolat.
Étape 3 : Ajout de la couleur Ajoutez la coloration progressivement, en commençant par quelques gouttes ou une petite quantité sur la pointe d'un cure-dent. Remuez soigneusement et évaluez la couleur avant d'en ajouter davantage.
Étape 4 : Mélange approfondi Remuez constamment dans une seule direction pour assurer une répartition uniforme de la couleur. Évitez de créer des bulles d'air en remuant doucement mais soigneusement.
Étape 5 : Évaluation de la couleur Testez la couleur sur une petite surface ou une cuillère pour voir la teinte réelle. N'oubliez pas que les couleurs apparaissent souvent différemment une fois fixées par rapport à l'état liquide.
Étape 6 : Ajustements finaux Effectuez tous les ajustements de couleur nécessaires avant d'utiliser le chocolat. Il est beaucoup plus facile d'ajuster la couleur à ce stade que après que le chocolat ait été utilisé dans votre projet.
Techniques professionnelles pour comment colorer le chocolat
Les chocolatiers professionnels ont développé des techniques avancées pour comment colorer le chocolat qui garantissent des résultats cohérents et de haute qualité à travers différentes applications et tailles de lots.
La méthode de semis : Les chocolatiers professionnels utilisent souvent une méthode de semis où ils fondent seulement une partie de leur chocolat, ajoutent le colorant, puis incorporent progressivement le reste du chocolat. Cette technique aide à maintenir le tempérage tout en assurant une répartition uniforme de la couleur.
Contrôle de l'intensité de la couleur : Obtenir l'intensité de couleur parfaite nécessite de comprendre la relation entre la concentration de colorant et l'apparence finale. Les techniques professionnelles incluent :
Construction de dégradé : Commencez par la teinte la plus claire souhaitée et approfondissez progressivement la couleur en ajoutant de petites quantités de colorant. Cette approche évite de dépasser la couleur cible et permet un contrôle précis.
Protocole de lot d'essai : Créez toujours de petits lots d'essai avant de colorer de grandes quantités. Les chocolatiers professionnels testent généralement avec 50 à 100 grammes de chocolat pour perfectionner leur formule de couleur avant de passer à une échelle supérieure.
Surveillance de la température : Utilisez un thermomètre numérique pour maintenir un contrôle précis de la température tout au long du processus de coloration. Les fluctuations de température peuvent affecter la répartition de la couleur et le tempérage du chocolat.
Techniques de cohérence des lots : Pour plusieurs lots nécessitant des couleurs identiques, documentez vos mesures exactes et votre processus. Les opérations professionnelles tiennent des registres détaillés des formulations de couleurs réussies pour référence future.
Mesures de contrôle qualité :
- Évaluation visuelle sous différentes conditions d'éclairage
- Évaluation de la texture après prise
- Tests de dégustation pour s'assurer que la saveur n'est pas compromise
- Documentation des formulations réussies
Travailler avec différentes couleurs de base de chocolat
Chaque type de chocolat présente des opportunités et des défis uniques en matière de coloration. Comprendre comment travailler avec différentes bases de chocolat maximise votre potentiel créatif tout en garantissant des résultats réussis.
Maîtrise du chocolat blanc : Le chocolat blanc sert de toile idéale pour des couleurs vibrantes grâce à sa base neutre. L'absence de solides de cacao signifie que les couleurs apparaissent fidèles à leur teinte prévue sans interférence des pigments sous-jacents.
Techniques optimales de coloration pour le chocolat blanc :
- Utilisez des quantités minimales de colorant pour des effets pastel
- Augmentez l'intensité progressivement pour des nuances vibrantes
- Expérimentez avec des combinaisons de couleurs pour des teintes personnalisées
- Prenez en compte l'application finale lors du choix de l'intensité des couleurs
Stratégies pour le chocolat au lait : Travailler avec le chocolat au lait nécessite d'embrasser ses tons naturels de caramel plutôt que de lutter contre eux. Les stratégies de couleur réussies incluent le choix de couleurs complémentaires et l'ajustement des attentes pour les résultats finaux.
Principes d'harmonie des couleurs :
- Sélectionnez des couleurs qui mettent en valeur plutôt que de contraster avec la base
- Utilisez des tons chauds qui complètent les notes de caramel
- Envisagez des accents métalliques qui s'accordent avec les nuances dorées
- Adoptez l'esthétique unique que la coloration du chocolat au lait offre
Applications du chocolat noir : Bien que le chocolat noir limite les options de couleur, il excelle dans des applications spécifiques comme la pulvérisation de poudres métalliques, la création de contrastes avec des éléments de couleur plus claire, ou comme base dramatique pour les décorations de surface.
Dépannage des problèmes courants de coloration du chocolat
Même les chocolatiers expérimentés rencontrent parfois des difficultés lors de la coloration du chocolat. Comprendre les problèmes courants et leurs solutions aide à maintenir des résultats professionnels et à éviter le gaspillage d'ingrédients.
Récupération du chocolat saisi : Si le chocolat seize à cause du contact avec l'eau, une action immédiate peut parfois sauver la préparation. Ajoutez progressivement du beurre de cacao chaud ou de l'huile de coco tout en remuant vigoureusement. Cette technique ne fonctionne pas toujours, mais elle vaut la peine d'être tentée avant de jeter le chocolat.
Stratégies de prévention :
- Assurez-vous que tout l'équipement est complètement sec
- Utilisez uniquement des colorants à base d'huile
- Maintenez une température adéquate tout au long du processus
- Travaillez dans des environnements à faible humidité lorsque c'est possible
Répartition inégale de la couleur : Une coloration striée ou inégale indique un mélange insuffisant ou une incorporation incorrecte du colorant. Ce problème survient souvent lorsque le colorant est ajouté trop rapidement ou lorsque la température du chocolat est incorrecte.
Solutions pour une coloration uniforme :
- Ajoutez le colorant plus progressivement
- Augmentez le temps et la consistance du mélange
- Vérifiez la température du chocolat avant d'ajouter la couleur
- Envisagez de chauffer légèrement le colorant avant incorporation
Problèmes d'intensité de couleur : Les couleurs qui paraissent trop claires ou trop foncées peuvent résulter de divers facteurs, notamment la couleur de base du chocolat, le type de colorant et les niveaux de concentration.
Techniques d'ajustement de l'intensité :
- Construisez la couleur progressivement plutôt que d'ajouter de grandes quantités d'un coup
- Testez les couleurs sur de petits échantillons avant l'application complète
- Documentez les formulations réussies pour référence future
- Prenez en compte l'environnement de visualisation de votre produit fini
Problèmes de texture : La coloration peut parfois affecter la texture du chocolat, le rendant plus épais ou modifiant ses propriétés d'écoulement. Ce problème est souvent lié au type ou à la quantité de colorant utilisé.
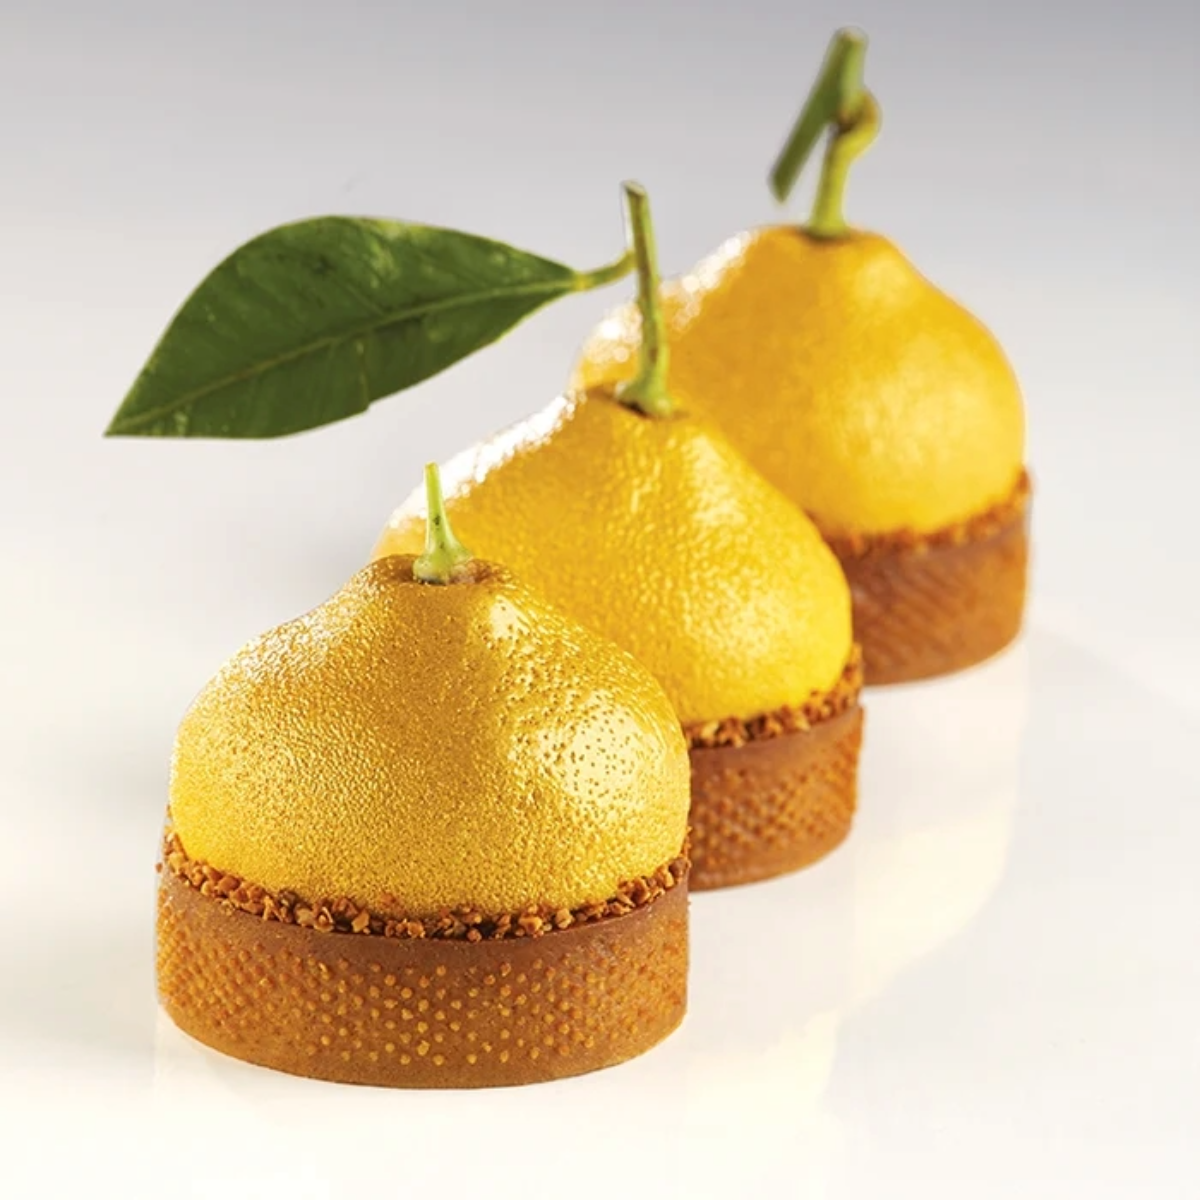
Applications créatives et idées de design
Maîtriser comment colorer le chocolat ouvre de nombreuses possibilités créatives tant pour les applications professionnelles que domestiques. Ces techniques peuvent transformer un travail chocolat simple en créations artistiques époustouflantes.
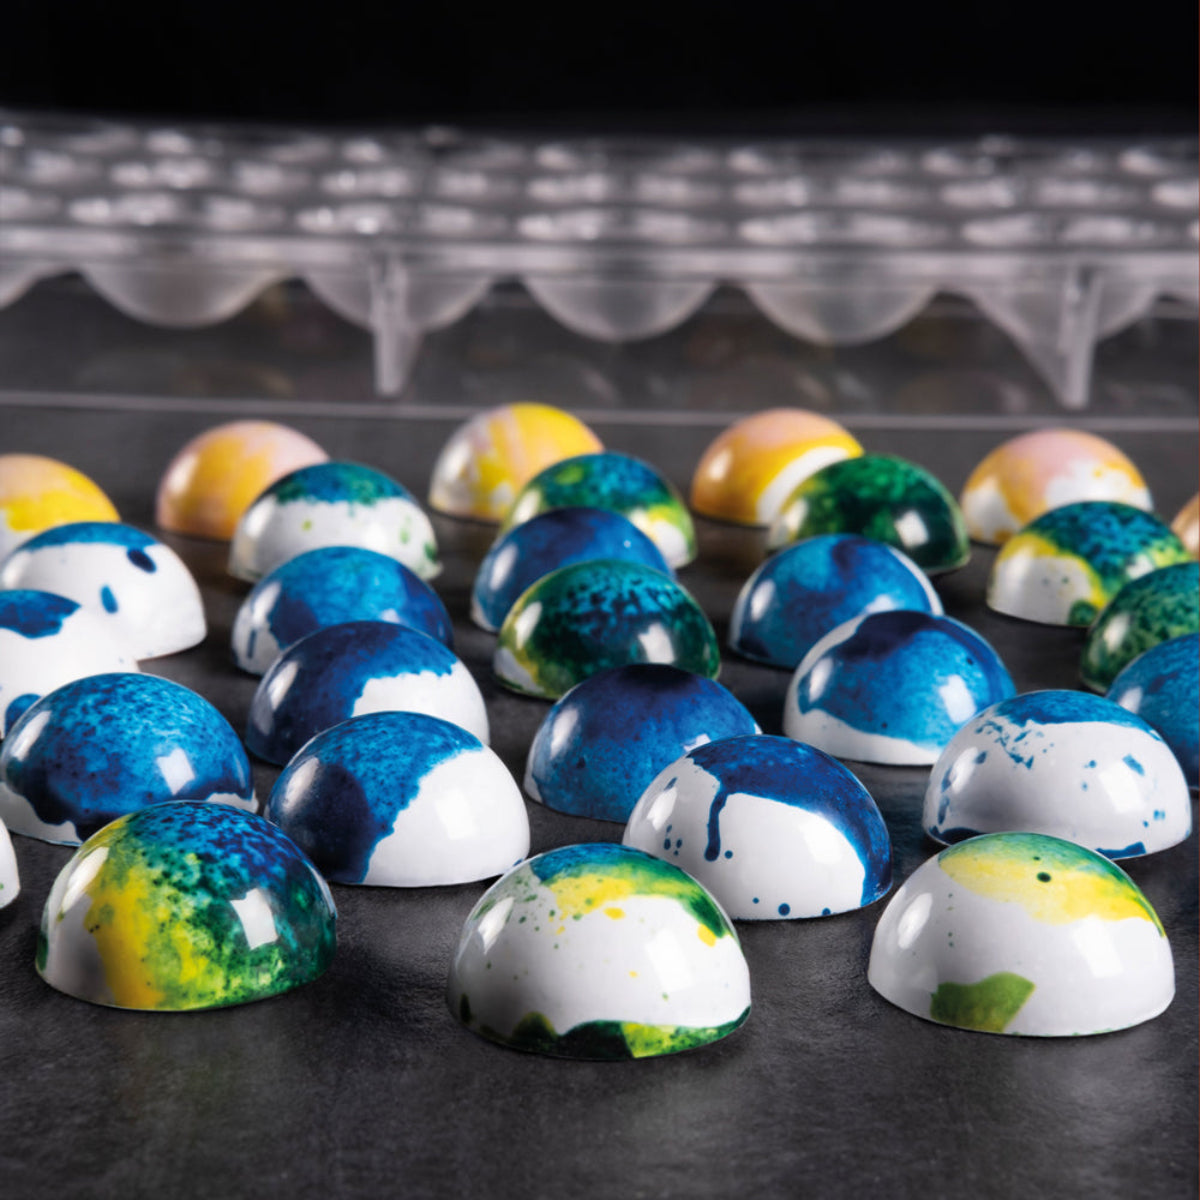
Techniques d'effet marbré : Créez des motifs marbrés sophistiqués en mélangeant partiellement différents chocolats colorés. Cette technique fonctionne particulièrement bien pour l'écorce de chocolat, les chocolats moulés et les éléments décoratifs.
Méthodes d'application :
- Tourbillonnez différents chocolats colorés avec un cure-dent
- Superposez les couleurs dans les moules pour des effets stratifiés
- Utilisez des flacons presseurs pour créer des motifs contrôlés
- Combinez des couleurs métalliques et standard pour des apparences luxueuses
Applications du dégradé de couleur : Les transitions de couleur progressives créent des résultats élégants et professionnels, parfaits pour les chocolats d'occasion spéciale et les présentations artistiques.
Techniques de dégradé :
- Appliquez au pinceau différentes intensités de la même couleur dans les moules
- Superposez des nuances progressivement plus foncées ou plus claires
- Utilisez des techniques d'aérographie pour des transitions douces
- Combinez des effets de dégradé avec des éléments texturés
Schémas de couleurs thématiques : Développez des palettes de couleurs qui correspondent à des thèmes, saisons ou occasions spécifiques. Considérez comment les couleurs fonctionnent ensemble et avec votre base de chocolat pour créer des présentations cohérentes.
Applications thématiques populaires :
- Couleurs de fête pour les gourmandises saisonnières
- Couleurs d'entreprise pour les cadeaux d'affaires
- Thèmes de mariage avec des palettes sophistiquées
- Thèmes de fêtes pour enfants avec des couleurs vives et amusantes
Les chocolatiers professionnels développent souvent des combinaisons de couleurs signatures qui deviennent une partie de leur identité de marque, créant des créations chocolatées reconnaissables et mémorables.
Options de coloration naturelle vs artificielle
Le choix entre les agents colorants naturels et artificiels affecte non seulement l'apparence de votre chocolat, mais aussi son profil de saveur, sa durée de conservation et son attrait pour différentes préférences des consommateurs.
Avantages des colorants naturels : Les colorants naturels apportent souvent des saveurs complémentaires tout en fournissant de la couleur. La poudre de fraise lyophilisée ajoute à la fois une couleur rose et une saveur de baies, tandis que la poudre de cacao intensifie les tons bruns sans concurrencer le goût naturel du chocolat.
Colorants naturels efficaces :
- Poudre de matcha - fournit une couleur verte avec une saveur terreuse et sophistiquée
- Poudres de fruits lyophilisés - offre des couleurs vives avec des saveurs de fruits
- Spiruline - crée des teintes bleu-vert avec un impact minimal sur la saveur
- Curcuma - fournit une couleur jaune doré avec une chaleur subtile
Avantages des colorants artificiels : Les colorants synthétiques offrent une intensité de couleur, une consistance et une stabilité de conservation supérieures à la plupart des options naturelles. Ils fournissent des résultats prévisibles et n'introduisent pas de saveurs supplémentaires pouvant entrer en conflit avec les profils du chocolat.
Considérations professionnelles :
- Stabilité de la couleur dans le temps
- Impact sur la saveur du produit final
- Préférences des consommateurs et restrictions alimentaires
- Considérations de coût pour les applications commerciales
- Exigences réglementaires sur différents marchés
Le choix entre colorants naturels et artificiels dépend souvent de votre application spécifique, du public cible et des préférences personnelles concernant la provenance des ingrédients.
Techniques de coloration avancées
Les chocolatiers professionnels utilisent des techniques sophistiquées qui vont au-delà du simple mélange de couleurs pour créer des créations chocolatées complexes et visuellement époustouflantes.
Aérographie sur chocolat : L'aérographie permet une application précise des couleurs, des dégradés lisses et des finitions de qualité professionnelle difficiles à obtenir par d'autres méthodes.
Exigences pour l'installation de l'aérographie :
- Équipement d'aérographie sûr pour les aliments
- Colorants correctement dilués
- Espace de travail bien ventilé
- Pratiquez la technique avant l'application finale
Méthodes de superposition des couleurs : Construire les couleurs par plusieurs couches fines crée une profondeur et une richesse impossibles à obtenir avec une seule application. Cette technique fonctionne particulièrement bien pour créer des effets métalliques et des transitions de couleurs complexes.
Stratégie de superposition :
- Appliquez d'abord les couleurs de base
- Augmentez l'intensité par des applications légères successives
- Utilisez des pochoirs ou masques pour des motifs précis
- Laissez chaque couche durcir avant d'appliquer la suivante
Intégration texture et couleur : Combiner des éléments texturaux avec la couleur crée des expériences multisensorielles qui élèvent le chocolat de simple confiserie à création artistique.
Techniques d'amélioration texturale :
- Incorporez du beurre de cacao coloré pour des finitions lisses et brillantes
- Utilisez des cristaux de sucre colorés pour de l'éclat et du croquant
- Appliquez la poudre colorée après un durcissement partiel pour des effets subtils
- Combinez des finitions mates et brillantes pour créer du contraste
Considérations sur le stockage et la durée de conservation
Un chocolat correctement coloré nécessite un stockage approprié pour maintenir à la fois l'intégrité de la couleur et la qualité du chocolat au fil du temps. Comprendre comment différents colorants affectent la durée de conservation aide à garantir que vos créations restent belles et délicieuses.
Facteurs de stabilité des couleurs : L'exposition à la lumière, les fluctuations de température et l'humidité affectent toutes l'apparence des couleurs au fil du temps. Certains colorants naturels sont particulièrement sensibles à la lumière et peuvent s'estomper ou changer de teinte après une exposition prolongée.
Conditions de stockage optimales :
- Températures fraîches et constantes entre 15 et 20 °C
- Environnements à faible humidité inférieure à 50 % d'humidité relative
- Protection contre la lumière directe, en particulier l'exposition aux UV
- Contenants hermétiques pour éviter l'absorption d'humidité
Considérations d'emballage : Pour les chocolats colorés destinés aux cadeaux ou à la vente commerciale, les choix d'emballage affectent à la fois la conservation des couleurs et la présentation du produit.
Stratégies d'emballage professionnelles :
- Emballages protecteurs UV pour les couleurs sensibles à la lumière
- Matériaux barrières à l'humidité pour prévenir le fleurissement
- Solutions de stockage stables en température
- Étiquetage clair des exigences de stockage pour les clients
Contrôle de la qualité : Une évaluation régulière des chocolats colorés stockés permet d'identifier tout problème de dégradation avant qu'il n'affecte l'ensemble du lot.
Questions fréquemment posées
Quel type de colorant alimentaire fonctionne le mieux pour le chocolat ? Le colorant alimentaire à base d'huile spécialement conçu pour le chocolat offre les meilleurs résultats. Les colorants en gel formulés pour le chocolat sont idéaux car ils offrent une couleur intense avec un ajout minimal de volume et ne provoquent pas le saisissement du chocolat.
Pourquoi mon chocolat est-il devenu épais et granuleux lorsque j'ai ajouté du colorant ? Cela indique un "saisissement" du chocolat, qui se produit lorsque des colorants à base d'eau entrent en contact avec le chocolat. L'eau fait que les solides de cacao s'agglutinent, créant une texture inutilisable. Utilisez toujours des colorants à base d'huile conçus pour le chocolat.
Puis-je utiliser du colorant alimentaire ordinaire du supermarché ? La plupart des colorants alimentaires vendus en supermarché sont à base d'eau et feront grainer le chocolat. Cherchez spécifiquement des colorants à base d'huile ou compatibles avec le chocolat, que l'on trouve souvent dans les magasins spécialisés en pâtisserie ou chez les fournisseurs en ligne.
Quelle quantité de colorant dois-je ajouter au chocolat ? Commencez par de toutes petites quantités - littéralement quelques gouttes ou la pointe d'un cure-dent. Vous pouvez toujours en ajouter, mais vous ne pouvez pas retirer la couleur une fois qu'elle est mélangée. Construisez la couleur progressivement jusqu'à obtenir la teinte désirée.
L'ajout de couleur affecte-t-il le goût du chocolat ? Les colorants pour chocolat de haute qualité devraient avoir un impact minimal sur la saveur. Cependant, certains colorants naturels comme le matcha ou les poudres de fruits ajouteront leurs propres saveurs. Goûtez toujours le chocolat coloré avant de l'utiliser dans des projets importants.
Puis-je mélanger différentes couleurs ensemble ? Oui, vous pouvez mélanger différents colorants pour créer des couleurs personnalisées, tout comme en mélangeant de la peinture. Commencez par de petites quantités test pour obtenir la teinte désirée avant de colorer de plus grandes quantités de chocolat.
Combien de temps les chocolats colorés se conservent-ils ? Les chocolats colorés correctement stockés conservent leur qualité pendant la même durée que le chocolat non coloré - généralement 6 à 12 mois selon le type de chocolat. Cependant, certains colorants naturels peuvent s'estomper avec le temps, surtout lorsqu'ils sont exposés à la lumière.
Quelle est la différence entre colorer le chocolat blanc, au lait et noir ? Le chocolat blanc accepte les couleurs le plus facilement et montre une représentation fidèle des couleurs. Le chocolat au lait a une base beige qui affecte l'apparence des couleurs, tandis que le chocolat noir convient généralement uniquement aux couleurs plus foncées ou aux applications en surface en raison de sa couleur brun foncé.
Conclusion
Maîtriser comment colorer le chocolat transforme les confiseries ordinaires en créations extraordinaires qui ravissent à la fois l'œil et le palais. Que vous créiez des barres de chocolat colorées simples pour une fête à thème ou que vous développiez des chocolats artistiques complexes pour une présentation professionnelle, comprendre les principes et techniques décrits dans ce guide garantit des résultats constants et professionnels.
La clé d'une coloration réussie du chocolat réside dans la compréhension de la science derrière la composition du chocolat et le choix d'agents colorants appropriés qui fonctionnent en harmonie avec le beurre de cacao et les autres composants du chocolat. En utilisant des colorants à base d'huile, en maintenant des températures appropriées et en construisant les couleurs progressivement, vous pouvez obtenir des couleurs vives et stables qui améliorent plutôt que compromettent la qualité de votre chocolat.
Pour ceux qui sont prêts à commencer leur aventure de coloration du chocolat, des matériaux de qualité font toute la différence. Découvrez des couleurs pour chocolat et d'autres ingrédients premium chez Zucchero Canada pour garantir que vos projets de coloration du chocolat obtiennent des résultats de qualité professionnelle.


Laisser un commentaire
Tous les commentaires sont modérés avant d'être publiés.
Ce site est protégé par hCaptcha, et la Politique de confidentialité et les Conditions de service de hCaptcha s’appliquent.