


La création de cœurs en chocolat avec des moules en silicone produit des confiseries romantiques parfaites pour la Saint-Valentin, les mariages, les anniversaires et les cadeaux attentionnés tout au long de l'année. Ce guide complet révèle des méthodes professionnelles pour fabriquer des chocolats en forme de cœur de qualité boulangerie à l'aide de moules en silicone flexibles, des approches de tempérage optimales et une décoration créative qui élève les confiseries faites maison aux standards artisanaux.
Comprendre les moules en silicone pour cœurs en chocolat
Les moules en silicone offrent des avantages distincts pour le travail du chocolat, avec une flexibilité, une résistance à la chaleur et des propriétés antiadhésives naturelles qui simplifient le démoulage du chocolat par rapport aux alternatives rigides en polycarbonate.
Avantages du silicone pour les formes de cœur
Les moules en silicone offrent des avantages distincts pour apprendre à faire des cœurs en chocolat. Le matériau flexible libère les chocolats avec une légère pression, réduisant les risques de casse, particulièrement importants pour les formes de cœur délicates avec des pointes. Le silicone résiste aux températures extrêmes, du gel à 232 °C (450 °F), ce qui permet de faire prendre le chocolat et de le nettoyer sans dégradation du matériau.
Le moule à gelée en silicone en forme de cœur à 24 cavités démontre la polyvalence du silicone pour les cœurs en chocolat, produisant plusieurs pièces simultanément. Contrairement aux moules rigides nécessitant un tempérage parfait pour le démoulage, le silicone pardonne les imperfections de tempérage mineures grâce à sa flexibilité. Cette tolérance rend le silicone idéal pour les débutants qui maîtrisent les techniques de fabrication des cœurs en chocolat.
Sélection des motifs de moules en forme de cœur
Les motifs de moules en forme de cœur vont des formes symétriques classiques aux styles asymétriques contemporains. Les moules tridimensionnels offrent de la profondeur, créant des chocolats impressionnants, tandis que les motifs plats plus simples conviennent aux chocolats fourrés et aux applications d'écorce.
|
Style de moule |
Meilleures applications |
Niveau de compétence |
|
Cœurs plats |
Écorce, chocolats garnis |
Débutant |
|
Cœurs 3D |
Chocolats creux, pièces maîtresses |
Intermédiaire |
|
Multi-cavités |
Production, cadeaux |
Tous niveaux |
|
Mini cœurs |
Garnitures, décorations |
Débutant |
Tenez compte de la profondeur des cavités lors de la sélection des motifs de moules. Les cavités peu profondes conviennent aux chocolats solides et aux bonbons, tandis que les cavités plus profondes peuvent accueillir des centres fourrés ou une construction creuse. Notre collection de moules en silicone pour pâtisserie et chocolat offre des profondeurs variées au sein de moules uniques, permettant une production diverse de cœurs en chocolat.

Matériel et équipement essentiels
Les cœurs en chocolat professionnels nécessitent un chocolat de qualité, des moules bien préparés et des outils facilitant un flux de production fluide.
Sélection du chocolat pour les moules en silicone
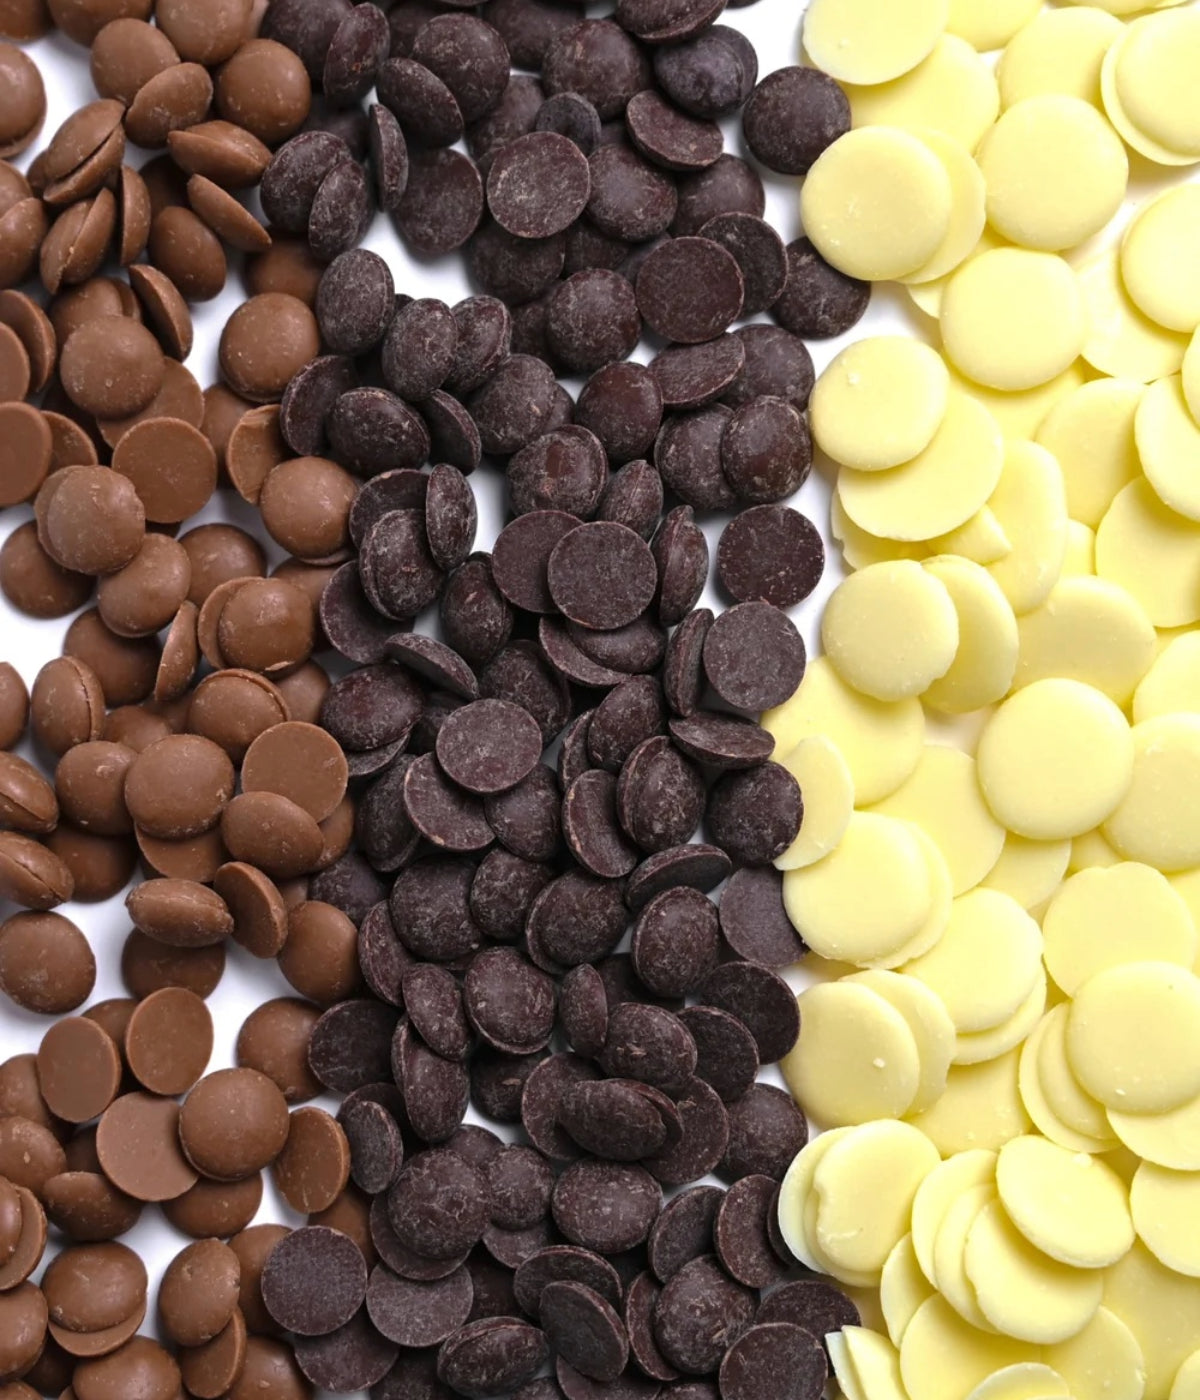
Les cœurs en chocolat donnent les meilleurs résultats avec du chocolat correctement tempéré ou un enrobage de qualité. Le chocolat de couverture contenant au minimum 31 % de beurre de cacao offre une cassure supérieure et un fini brillant lorsqu'il est correctement tempéré. Le chocolat noir 55 % Venezuela offre une saveur riche parfaite pour les cœurs en chocolat romantiques, tandis que le chocolat blanc FCH origine latino-américaine 28 % offre une toile pour la coloration et la décoration.
Le chocolat composé à base d'huiles végétales élimine les exigences de tempérage, idéal pour les débutants qui apprennent à faire des cœurs en chocolat avec des moules en silicone. Les pastilles de chocolat blanc à fondre de 5 kg constituent une option économique pour la production en grande quantité.
Le chocolat Ruby crée de superbes cœurs en chocolat roses sans colorant artificiel. La saveur naturelle de baies complète parfaitement les thèmes romantiques. Pour une qualité artisanale, envisagez des options d'origine unique offrant des profils de saveur distinctifs.
Outils et fournitures nécessaires
La création de cœurs en chocolat professionnels exige un équipement spécifique au-delà des ustensiles de cuisine de base. Un thermomètre numérique assure une surveillance précise de la température pendant le tempérage, tandis que des racloirs en plastique souple éliminent l'excès de chocolat sans endommager les moules flexibles.
Un équipement de fusion professionnel maintient une température de chocolat constante. Le Meltinchoc Chocolate Melter Multi-Tank 3L peut accueillir plusieurs types de chocolat simultanément, parfait pour créer des cœurs de différentes couleurs ou saveurs.
Les fournitures supplémentaires comprennent du papier sulfurisé, des grilles de refroidissement et des récipients de stockage maintenant des conditions optimales pour les cœurs en chocolat finis.
Préparation adéquate des moules en silicone
Nettoyage et conditionnement
Lavez soigneusement les nouveaux moules en silicone avec de l'eau chaude savonneuse pour éliminer les résidus de fabrication avant la première utilisation. Rincez complètement et séchez avec un chiffon non pelucheux ou laissez sécher à l'air libre, retournés sur une serviette propre. Toute humidité peut faire épaissir le chocolat et provoquer l'apparition de taches blanches, ruinant ainsi l'aspect final.
Polissez les cavités du moule avec un chiffon en coton doux pour enlever toute poussière ou empreinte digitale. Bien que le silicone résiste naturellement au collage, la propreté affecte considérablement la qualité du chocolat fini. Évitez d'utiliser de l'huile, un aérosol de cuisson ou d'autres agents de démoulage avec le chocolat ; ces substances créent un film trouble sur les surfaces du chocolat et affectent négativement la saveur.
Entre les utilisations, lavez les moules à l'eau chaude savonneuse, rincez-les abondamment et séchez-les complètement avant de les ranger. Rangez les moules en silicone à plat ou suspendus dans un endroit propre et sec pour éviter l'accumulation de poussière. Inspectez régulièrement les moules pour détecter les déchirures ou la dégradation, en remplaçant ceux qui sont endommagés et qui affectent la qualité.
Considérations relatives à la température
Les moules en silicone à température ambiante sont les meilleurs pour la production de cœurs en chocolat. Les moules froids font prendre le chocolat trop rapidement, créant des coquilles épaisses et une mauvaise capture des détails, tandis que les moules chauds empêchent une cristallisation correcte. Laissez les moules s'équilibrer à la température de l'espace de travail, environ 18-21 °C (65-70 °F), avant utilisation.
Certains chocolatiers réfrigèrent brièvement les moules en silicone avant de verser le chocolat, accélérant ainsi la prise pour une meilleure efficacité de production. Cette technique fonctionne avec le chocolat composé, mais risque une cristallisation de tempérage incorrecte avec le chocolat de couverture.
Tempérage du chocolat pour moules en silicone
Un chocolat correctement tempéré crée des cœurs qui se cassent nettement, présentent un fini brillant et résistent au blanchiment pendant le stockage.
Comparaison des méthodes de tempérage
Les cœurs en chocolat bénéficient d'un tempérage approprié malgré la nature indulgente du silicone. La méthode d'ensemencement consiste à ajouter du chocolat non fondu au chocolat fondu, introduisant des cristaux stables dans tout le mélange. Faites fondre les deux tiers du chocolat à la température appropriée, ajoutez le chocolat restant progressivement en remuant jusqu'à ce que la température baisse, puis réchauffez doucement jusqu'à la température de travail.
|
Type de chocolat |
Temp. de fusion |
Temp. de refroidissement |
Temp. de travail |
Avantages du silicone |
|
Chocolat noir |
46-49°C (115-120°F) |
28-29°C (82-84°F) |
31-32°C (88-90°F) |
La flexibilité facilite le démoulage |
|
Chocolat au lait |
43-46°C (110-115°F) |
28-29°C (82-84°F) |
30-31°C (86-88°F) |
Manipulation plus douce prévient les dommages |
|
Chocolat blanc |
40-43°C (105-110°F) |
27-28°C (80-82°F) |
28-29°C (82-84°F) |
Risque de casse réduit |
Testez le tempérage en étalant une petite quantité sur du papier sulfurisé ; un chocolat correctement tempéré prendra en 3 à 5 minutes avec un léger fini mat. Les tempéreuses professionnelles automatisent ce processus pour une production constante. Pour le chocolat composé, faites-le simplement fondre à 35-38 °C (95-100 °F) sans exigences de tempérage.
Travailler avec du chocolat non tempéré
Le chocolat composé offre une approche simplifiée pour les débutants. Faites-le fondre doucement à 35-38 °C (95-100 °F), en évitant une chaleur excessive qui endommage les huiles végétales. Le chocolat composé prend rapidement dans les moules en silicone sans réfrigération, produisant des cœurs prêts à être démoulés en 20-30 minutes.
Bien que le chocolat composé n'ait pas la cassure et le fini brillant du chocolat tempéré, la flexibilité du silicone compense en partie en démoulant facilement les chocolats, quelle que soit leur structure cristalline. Cela fait du chocolat composé un excellent choix pour apprendre les techniques de fabrication de cœurs en chocolat avant de passer à un travail du chocolat tempéré plus exigeant.
Processus de moulage étape par étape
Création de cœurs en chocolat solides
Versez le chocolat tempéré ou fondu dans les cavités du moule en silicone jusqu'à ce qu'il soit légèrement trop rempli pour les cœurs solides. Tapez fermement le moule sur le comptoir 15 à 20 fois pour libérer les bulles d'air qui créent des trous dans les surfaces finies. Utilisez une raclette pour enlever l'excès de chocolat de la surface du moule, créant ainsi un fond plat permettant aux cœurs de tenir debout.
Laissez le chocolat cristalliser complètement avant de démouler. Le chocolat tempéré dans le silicone prend généralement à température ambiante en 30 à 45 minutes, bien que la réfrigération accélère le processus à 15 à 20 minutes si nécessaire. Le chocolat se contracte légèrement pendant la prise, se détachant naturellement du silicone flexible. Lorsque le chocolat développe un fini satiné et que les bords semblent légèrement séparés des parois du moule, les cœurs sont prêts à être retirés.
Inversez le moule sur une surface propre et pliez-le doucement pour aider les chocolats à se démouler. Appliquez une légère pression à l'arrière du moule près de chaque cavité pour encourager les cœurs à tomber proprement sans forcer, ce qui risquerait de les casser.
Fabrication de coquilles de cœur creuses
Les cœurs en chocolat creux nécessitent une technique d'enrobage pour construire des coquilles en plusieurs couches. Versez le chocolat dans les cavités, puis inversez immédiatement le moule pour laisser l'excédent s'écouler dans le bol. Faites tourner le moule pendant l'égouttage pour assurer un enrobage uniforme sur toutes les surfaces intérieures. Utilisez un racloir souple pour enlever l'excédent de la surface du moule.
Laissez la première couche prendre jusqu'à ce qu'elle soit collante mais pas complètement dure, environ 5 à 8 minutes. Appliquez une deuxième couche en utilisant la même méthode, en augmentant l'épaisseur de la coquille jusqu'à la résistance désirée. Deux couches minces créent des coquilles plus solides qu'une seule couche épaisse. Pour les cœurs en chocolat fourrés, appliquez une troisième couche après avoir positionné la garniture pour créer un compartiment scellé.
Les options de moules tridimensionnels conviennent parfaitement à la construction creuse, leur profondeur permettant d'accueillir des garnitures substantielles. Une fois que la dernière couche est complètement cristallisée, pliez doucement le moule pour libérer les cœurs en chocolat creux prêts à être garnis ou présentés.
Ajout de garnitures et de couches
Les cœurs en chocolat fourrés incorporent de la ganache, du caramel ou des préparations de fruits entre les couches de chocolat. Créez la base et les parois en chocolat comme décrit ci-dessus, laissez prendre jusqu'à ce qu'elles soient fermes, puis pochez la garniture à l'aide de sacs de pâtisserie. Laissez un léger espace en haut pour sceller la couche de chocolat, empêchant la garniture de toucher la surface du moule où elle serait visible.
Réfrigérez brièvement les cœurs garnis pour raffermir la garniture avant d'appliquer la dernière couche de chocolat. Cela empêche la garniture de se mélanger au chocolat de scellement ou de créer des bulles. Versez le chocolat sur la garniture et raclez à niveau avec la surface du moule.
Laissez cristalliser complètement avant de démouler les pièces fourrées. Le poids et l'humidité supplémentaires de la garniture nécessitent un temps de prise plus long que pour les cœurs solides. La patience à ce stade évite les fissures et les fuites de garniture qui ruinent l'aspect fini.
Techniques de décoration créatives
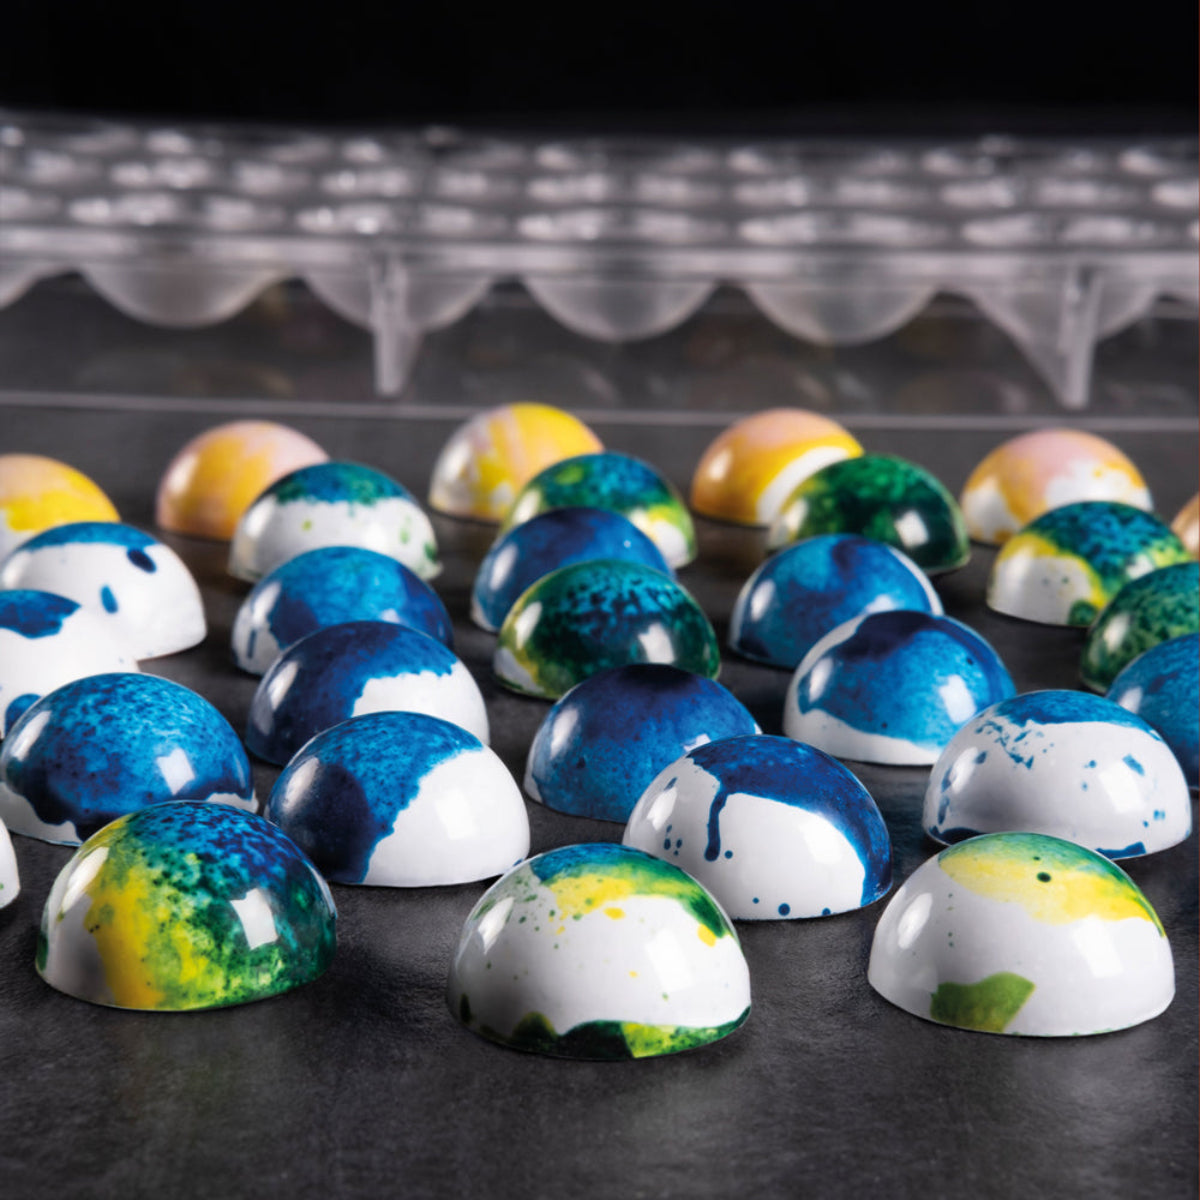
Utilisation de beurre de cacao coloré
Le pré-coloration des cavités de moule crée des motifs superbes. Chauffez les couleurs de beurre de cacao à consistance liquide et peignez des motifs dans des moules propres avant d'ajouter le chocolat. Créez des effets d'ombrage, des motifs géométriques ou des œuvres d'art à main levée. Pour une couverture uniforme, un équipement de pulvérisation professionnel offre des résultats exceptionnels.
Appliquez des couches légères en laissant chacune cristalliser avant d'ajouter des couches supplémentaires pour la profondeur et la dimension. La combinaison de différentes couleurs crée de belles teintes personnalisées, tandis que les accents dorés ajoutent des touches de luxe.
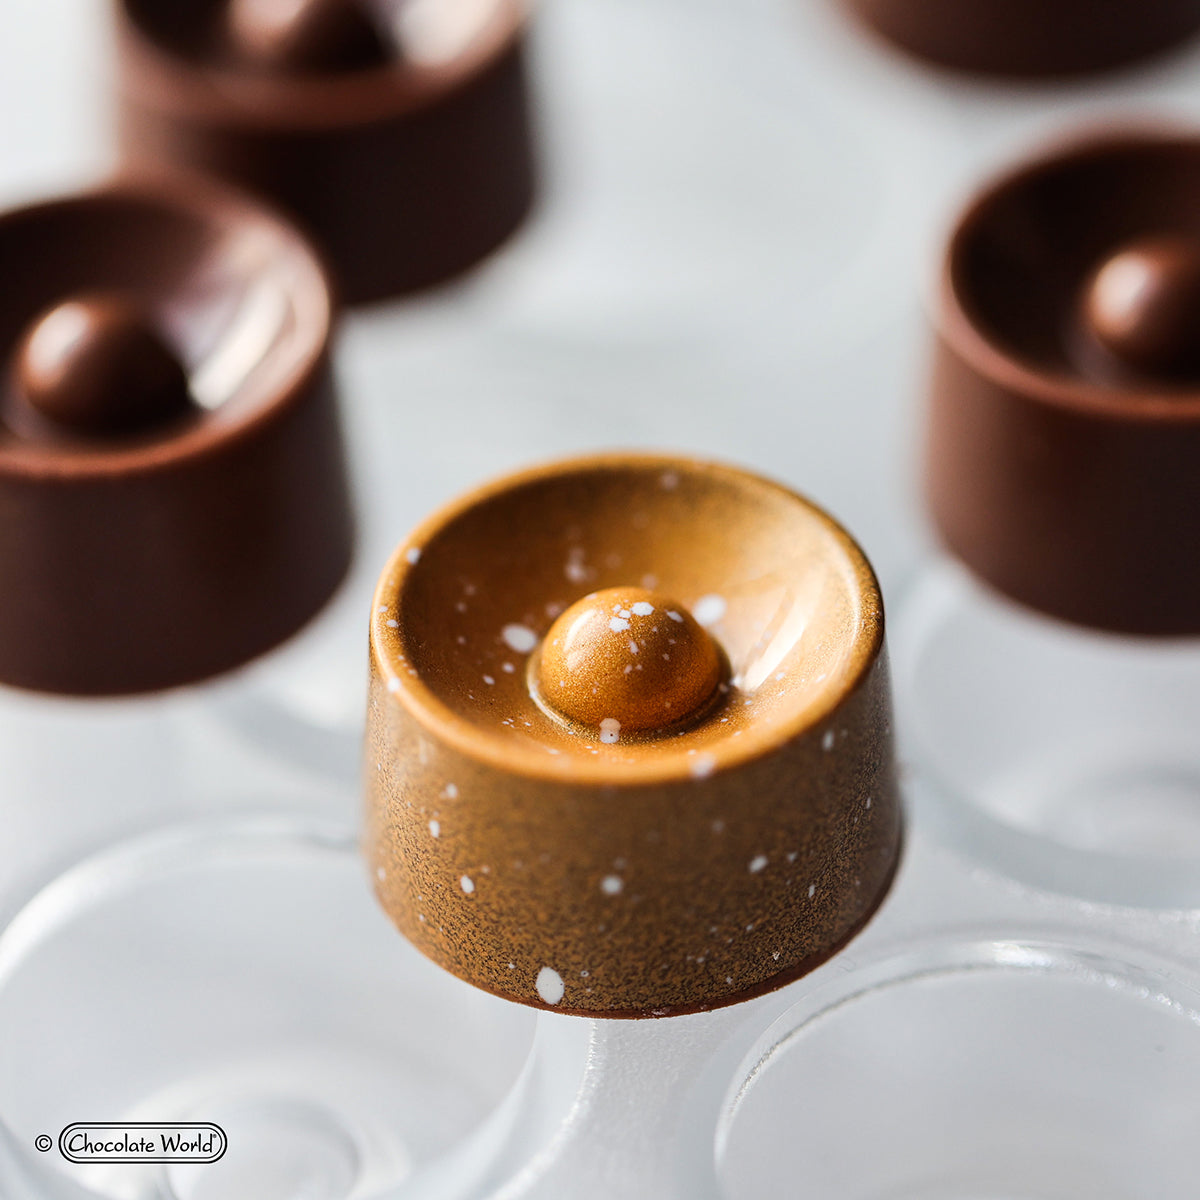
Finis métalliques et nacrés
Les effets métallisés créent des cœurs en chocolat de luxe, parfaits pour les mariages et les cadeaux haut de gamme. Les poudres métalliques saupoudrées sur les surfaces de chocolat durcies ajoutent un éclat, tandis que les finis nacrés procurent une lueur romantique.
Appliquez les poudres métalliques après le démoulage à l'aide de pinceaux doux ou mélangez-les avec de l'alcool neutre et pulvérisez à l'aide d'un aérographe. Les grains de chocolat nacrés de différentes couleurs pressés dans le chocolat avant la cristallisation complète créent des accents texturés. Ces éléments transforment de simples cœurs en chocolat en confiseries haut de gamme.
Pour les effets de texture veloutée, des sprays spécialisés créent un fini mat sophistiqué. Ces variétés conviennent parfaitement aux cœurs en chocolat, offrant une présentation romantique plus douce.
Ajout de garnitures et d'embellissements
Améliorez la présentation avec des éléments décoratifs. Pochez des motifs de chocolat contrastés, ajoutez des fleurs comestibles ou placez de petits copeaux de chocolat. Nos peignes et racloirs à décorer créent des motifs texturés dans le chocolat avant la cristallisation complète.
Envisagez d'ajouter de petits messages pochés dans du chocolat contrastant ou d'apposer des tampons à lettres sur du chocolat partiellement pris. L'application de feuilles d'or crée des cœurs ultra-luxueux parfaits pour les occasions spéciales. Ces touches finales témoignent d'une attention aux détails qui élève les cœurs faits maison à une qualité artisanale.

Dépannage des problèmes courants
Comprendre les solutions aux défis fréquents assure un succès constant dans tous les lots de production.
Chocolat collant aux moules
Bien que le silicone résiste naturellement au collage, un chocolat mal tempéré ou un temps de prise insuffisant provoque une adhérence tenace des cœurs. Assurez-vous que le chocolat passe le test de tempérage avant de le verser dans les moules. Laissez cristalliser complètement ; les tentatives de démoulage prématurées endommagent les chocolats, même avec du silicone flexible.
Si les chocolats collent malgré une technique appropriée, placez les moules remplis au réfrigérateur pendant 10 à 15 minutes. Le choc thermique provoque une contraction rapide, libérant généralement les morceaux tenaces. Pliez le moule doucement plutôt que de tirer directement les chocolats.
Bulles d'air et défauts de surface
L'air emprisonné crée des trous inesthétiques dans la surface des cœurs en chocolat. Tapotez vigoureusement le moule sur le comptoir immédiatement après le remplissage, en poussant l'air vers les ouvertures des cavités. Pour les motifs détaillés, utilisez une petite brosse pour pousser le chocolat dans les zones complexes avant de tapoter.
Le chocolat trop épais ou trop froid emprisonne plus facilement l'air. Maintenez une température de travail appropriée tout au long du moulage. Le chocolat fin s'écoule mieux dans les détails du moule, libérant naturellement l'air. Envisagez de faire vibrer les moules sur un équipement spécialisé pour des résultats professionnels sans bulles.
Fini terne ou strié
Le blanchiment, l'humidité ou un refroidissement inapproprié créent des cœurs en chocolat ternes et striés. Le blanchiment gras apparaît lorsque le chocolat chauffe et refroidit à plusieurs reprises, provoquant une séparation du beurre de cacao. Le blanchiment sucré se produit lorsque l'humidité entre en contact avec le chocolat, dissolvant le sucre qui recristallise en taches blanches.
Prévenez le blanchiment en maintenant une température constante pendant la cristallisation. Laissez les cœurs en chocolat prendre complètement à température ambiante plutôt que de les réfrigérer inutilement. Conservez les pièces finies dans un environnement frais et sec, à 15-18 °C (60-65 °F). Le chocolat correctement tempéré résiste mieux au blanchiment que les alternatives tempérées manuellement. Apprenez-en davantage dans notre guide sur comment éviter le blanchiment du chocolat.
Conservation et présentation
Conditions de stockage optimales
Conservez les cœurs en chocolat en une seule couche, séparés par du papier sulfurisé, dans des contenants hermétiques. Maintenez une température constante de 15 à 18 °C (60 à 65 °F) avec une humidité inférieure à 50 %. Évitez la réfrigération, sauf si absolument nécessaire ; les fluctuations de température provoquent de la condensation entraînant un blanchiment.
|
Aspect de stockage |
Recommandation |
Durée |
Impact sur la qualité |
|
Température |
15-18°C (60-65°F) |
En continu |
Prévient la fonte/le blanchiment |
|
Humidité |
Inférieure à 50% |
En continu |
Évite le blanchiment dû au sucre |
|
Contenant |
Hermétique |
2-3 mois |
Protège des odeurs |
|
Exposition à la lumière |
Obscur/minimale |
En continu |
Prévient l'oxydation des graisses |
Les cœurs en chocolat tempéré, correctement conservés, maintiennent leur qualité pendant 2 à 3 mois. Le chocolat de couverture dure un peu plus longtemps grâce à la stabilité de l'huile végétale. Étiquetez les contenants avec les dates de production pour suivre la fraîcheur et assurer le contrôle qualité.
Idées de présentation créatives
Présentez les cœurs en chocolat à l'aide de présentoirs à plusieurs niveaux, de boîtes décoratives ou de sacs transparents attachés avec des rubans. Nos options de présentation mettent en valeur les chocolats tout en les protégeant de la manipulation.
Disposez les cœurs en chocolat selon des motifs colorés ou créez des effets d'ombre avec différents chocolats colorés. Les boîtes individuelles transparentes permettent aux destinataires d'apprécier les détails décoratifs sans déballer. Ajoutez des éléments complémentaires comme des rubans, des fleurs séchées ou des cartes thématiques pour améliorer la présentation générale.
Mise à l'échelle de la production pour les événements
Passer d'une production en petite série à une production à l'échelle d'un événement nécessite une optimisation du flux de travail et un investissement en équipement.
Organisation efficace du flux de travail
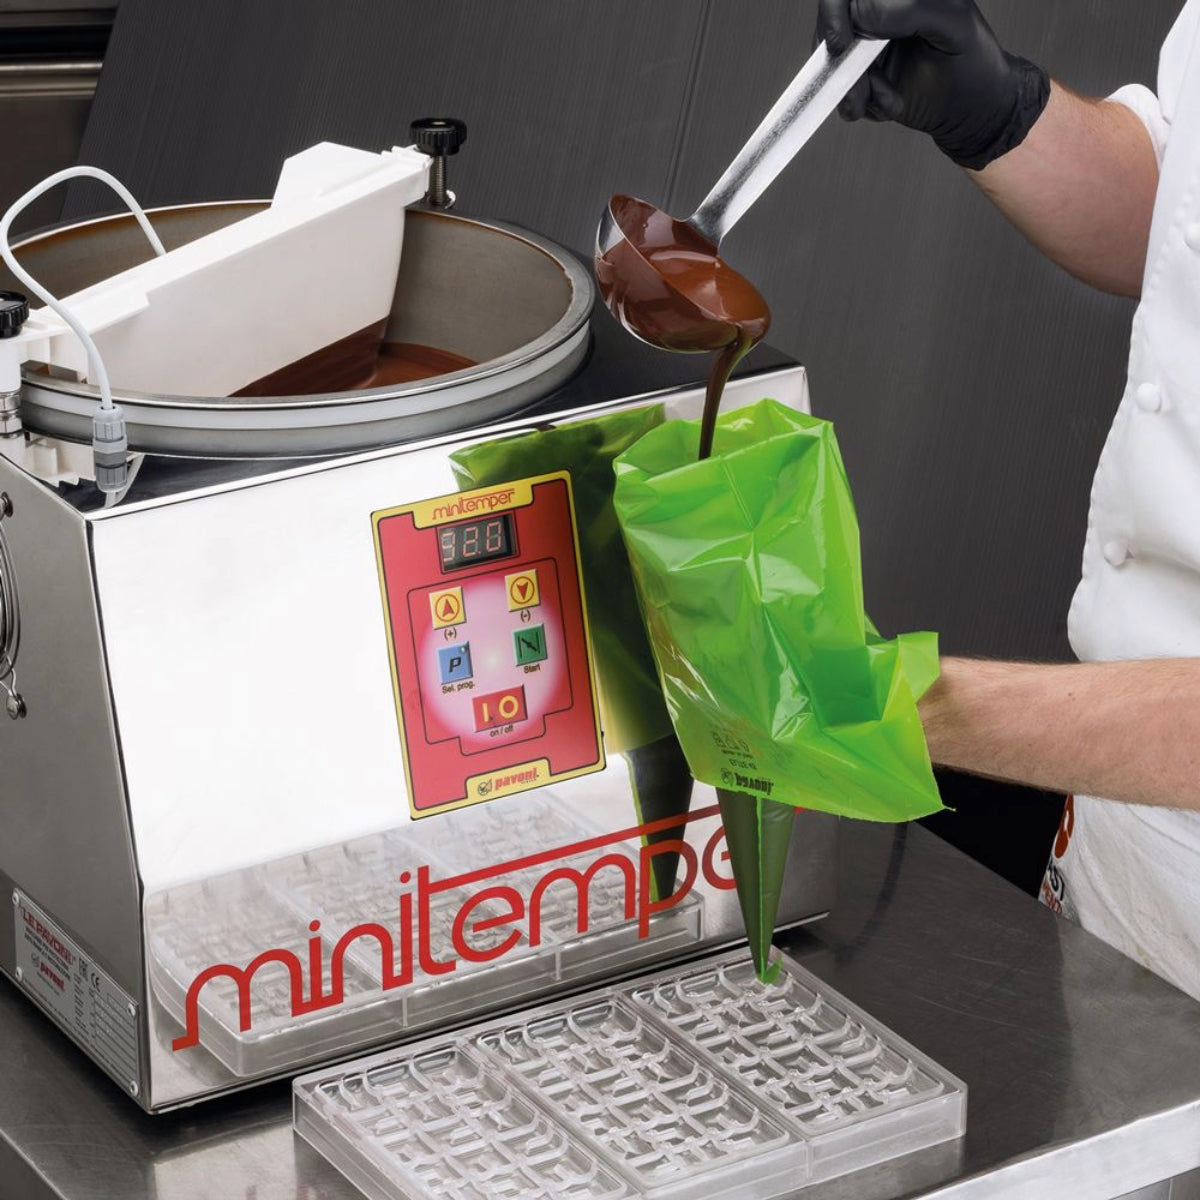
Organisez l'espace de travail de manière systématique pour une création efficace des cœurs en chocolat. Préparez tous les moules avant de tempérer le chocolat, en vous assurant que les surfaces propres et polies sont prêtes pour une utilisation immédiate. Tempérez de plus grandes quantités en maintenant une température de travail plus longue à l'aide de fondoirs à chocolat professionnels.
Travaillez à la chaîne : remplissez toutes les cavités du moule, grattez entièrement, laissez prendre simultanément plutôt que de finir chaque moule individuellement. Cette approche maximise l'efficacité pendant que le chocolat maintient sa température optimale. Plusieurs moules en silicone multi-cavités permettent un volume de production substantiel avec une qualité constante.
Investissement en équipement de production
Un équipement de qualité transforme l'efficacité de la production. Les machines de tempérage automatisées éliminent la variabilité manuelle, tandis que l'équipement de refroidissement maintient des températures de cristallisation optimales. L'équipement de pulvérisation professionnel rationalise la décoration pour les grandes quantités.
Considérez les ressources éducatives de maîtres chocolatiers apprenant des techniques avancées et l'inspiration de conception. Les livres sur le travail du chocolat fournissent des conseils de dépannage et un affinement des formules qui accélèrent le développement des compétences.
Applications pour occasions spéciales
Les cœurs en chocolat conviennent à diverses célébrations et événements, avec des options de personnalisation correspondant à des thèmes et des objectifs spécifiques.
Production pour la Saint-Valentin
La saison de la Saint-Valentin entraîne une demande maximale de cœurs en chocolat. Planifiez la production 2 à 3 semaines à l'avance pour gérer le volume des commandes. Offrez une variété de tailles, de saveurs et de styles de décoration pour répondre aux différentes préférences des clients. Le rouge et le rose classiques dominent, mais envisagez des options sophistiquées comme le chocolat noir avec des accents dorés ou le chocolat rubis mettant en valeur sa teinte rose naturelle.
Emballez les cœurs dans des présentations romantiques à l'aide de papier de soie rouge, de rubans de satin et de boîtes décoratives. Incluez des cartes de message ou des étiquettes personnalisées pour des cadeaux personnalisés. Une tarification échelonnée basée sur la qualité du chocolat, la complexité de la décoration et l'élaboration de l'emballage maximise les opportunités de revenus.
Chocolats de mariage et d'anniversaire
Les mariages et les anniversaires exigent des cœurs en chocolat élégants correspondant à la sophistication de l'événement. Coordonnez les couleurs du chocolat avec les thèmes du mariage en utilisant des colorants de beurre de cacao appropriés. Les cœurs en chocolat blanc décorés d'or ou d'argent comestible conviennent aux réceptions formelles, tandis que le chocolat au lait avec des décorations pastel complémente les mariages en jardin.
Offrez des créations de cœurs en chocolat comme cadeaux, compléments de table de desserts ou contenus de boîtes cadeaux. Un estampage personnalisé avec des initiales ou des dates personnalise les pièces. Un emballage professionnel élève la valeur perçue, justifiant une tarification premium pour les chocolats d'événement.
Conclusion
Maîtriser les cœurs en chocolat avec des moules en silicone combine des compétences techniques en chocolat avec une sensibilité au design créatif, produisant des confiseries romantiques parfaites pour exprimer l'affection toute l'année. Le succès exige de comprendre les propriétés uniques du silicone, d'exécuter une préparation appropriée du chocolat et d'appliquer des techniques de finition qui transforment de simples ingrédients en cadeaux impressionnants. Que ce soit pour créer des friandises de la Saint-Valentin, des cadeaux de mariage ou des expressions sincères du quotidien, ces méthodes fournissent une base complète pour l'excellence du chocolat en forme de cœur. Explorez les moules en silicone professionnels, le chocolat fin de qualité supérieure et les fournitures de décoration spécialisées chez Zucchero Canada pour créer des chocolats en forme de cœur qui captivent tant par leur apparence que par leur qualité exceptionnelle.
Références
Greweling, P. (2023). Chocolats et confiseries : Formule, théorie et technique pour l'artisan confiseur (3e éd.). John Wiley & Sons.
KREA Swiss. (2024). Équipement alimentaire professionnel et systèmes de pulvérisation pour l'art du chocolat. https://kreaswiss.com/food-equipment
National Confectioners Association. (2024). Meilleures pratiques de moulage du chocolat et normes de qualité. Manuel technique de la NCA.
Pavoni Italia. (2024). Collections de couleurs professionnelles pour la décoration de chocolats. https://pavonitalia.com/en/collections/professional-collezioni-colori-e-materie-prime
Sutherland, J. P. (2023). Ustensiles de cuisson en silicone : Propriétés et applications en confiserie. Food Technology Journal, 77(4), 45-52.


Laisser un commentaire
Tous les commentaires sont modérés avant d'être publiés.
Ce site est protégé par hCaptcha, et la Politique de confidentialité et les Conditions de service de hCaptcha s’appliquent.